This guide is for Hospital Admins — clinic owners and hospital administrators who manage one hospital in DoconDuty. Read Getting Started first.
1. Your role and its limits
As a Hospital Admin you manage your own hospital: its staff, doctors, patients, appointments, medicines, stock, prescriptions, bills and laboratory work. Everything you see and change belongs to your hospital only.
Some things are managed by the DoconDuty platform operator (Super Admin), not by you:
| Managed by you (Hospital Admin) | Managed by the platform operator (Super Admin) |
|---|---|
| Front Desk, Billing, Pharmacy and Lab staff accounts | Creating your hospital and your Hospital Admin account |
| Doctor accounts | Your hospital's subscription plan, its limits and its renewal |
| Patients, appointments, prescriptions | Suspending or reactivating a hospital |
| Your hospital's medicine master and stock | Website branding, contact details and other platform settings |
| Invoices, lab orders and reports | The "Book a Demo" sales enquiries (Demo Requests) |
| Your own name, phone number and password | Your login email address and your hospital's name and address |
The menu items Super Admin, Hospitals, Subscription Plans, Demo Requests and Settings are not shown to Hospital Admins. If you need any of those changes, contact platform support.
2. The Admin Portal menu
After you log in through the Admin Portal card, the sidebar shows:
| Menu item | What it is for | Covered in |
|---|---|---|
| Dashboard | Summary of today's activity | Section 3 |
| Patients | Patient records | Section 6 |
| Doctors | Doctor accounts and profiles | Section 5 |
| Appointments | Booking and status of appointments | Section 7 |
| EMR Records | Medical records and uploaded files | Section 13 |
| Prescriptions | Prescriptions, templates, refill requests | Section 10 |
| Billing | Invoices | Section 11 |
| Financial Summary | Earnings and payment overview | Section 13 |
| Medicines | Your hospital's medicine master | Section 8 |
| Diagnostics, Reports, Analytics | Diagnostic reports and statistics | Section 13 |
| Stock Management | Medicine stock levels | Section 9 |
| Intake Forms | Patient questionnaires | Section 13 |
| Lab Tests | Ordering lab tests and recording reports | Section 12 |
| Dr. Availability, Pharmacy, Notifications, Dr. Performance, Waitlist, Insurance Claims, Treatment Plans, Emergency Alerts, Dr. Marketplace | Additional modules | Section 13 |
| My Profile | Your details and password | Section 14 |
| Staff | Front Desk, Billing, Pharmacy and Lab accounts | Section 4 |
3. Understanding the dashboard
Purpose: See a quick summary of your hospital's day.
Who can do this: Hospital Admin.
When you log in, the Dashboard opens. It shows:
- Low Stock Alert (only when medicines are running low) — lists the medicines that need restocking, with a View Stock button.
- Four summary cards: Total Patients, Today's Appointments, Prescriptions and Revenue (paid invoices; the number of pending invoices is shown underneath).
- Clinic Analytics — today's revenue, today's appointments, average doctor rating, active doctors, and charts for the last 14 days.
- Further down: Today's Appointments, Recent Prescriptions and Quick Actions.
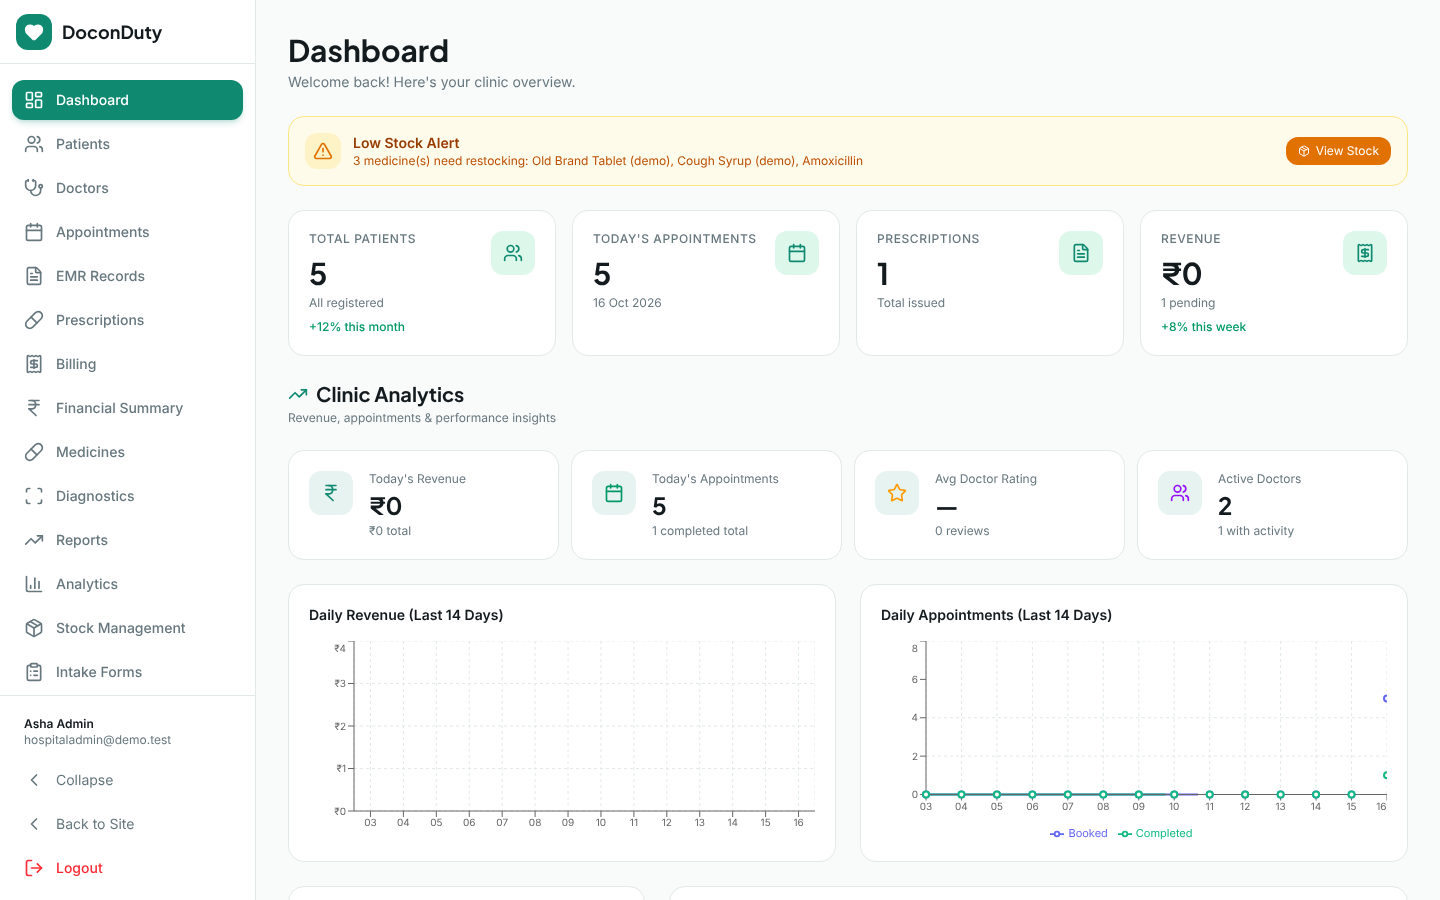
Important: The small green lines "+12% this month" under Total Patients and "+8% this week" under Revenue are fixed text. They are not calculated from your data. Ignore them when reviewing performance.
4. Managing staff accounts
You can create accounts for four kinds of staff: Front Desk, Billing Admin, Pharmacy Admin and Lab Admin. (Doctors are managed separately — see Section 5.)
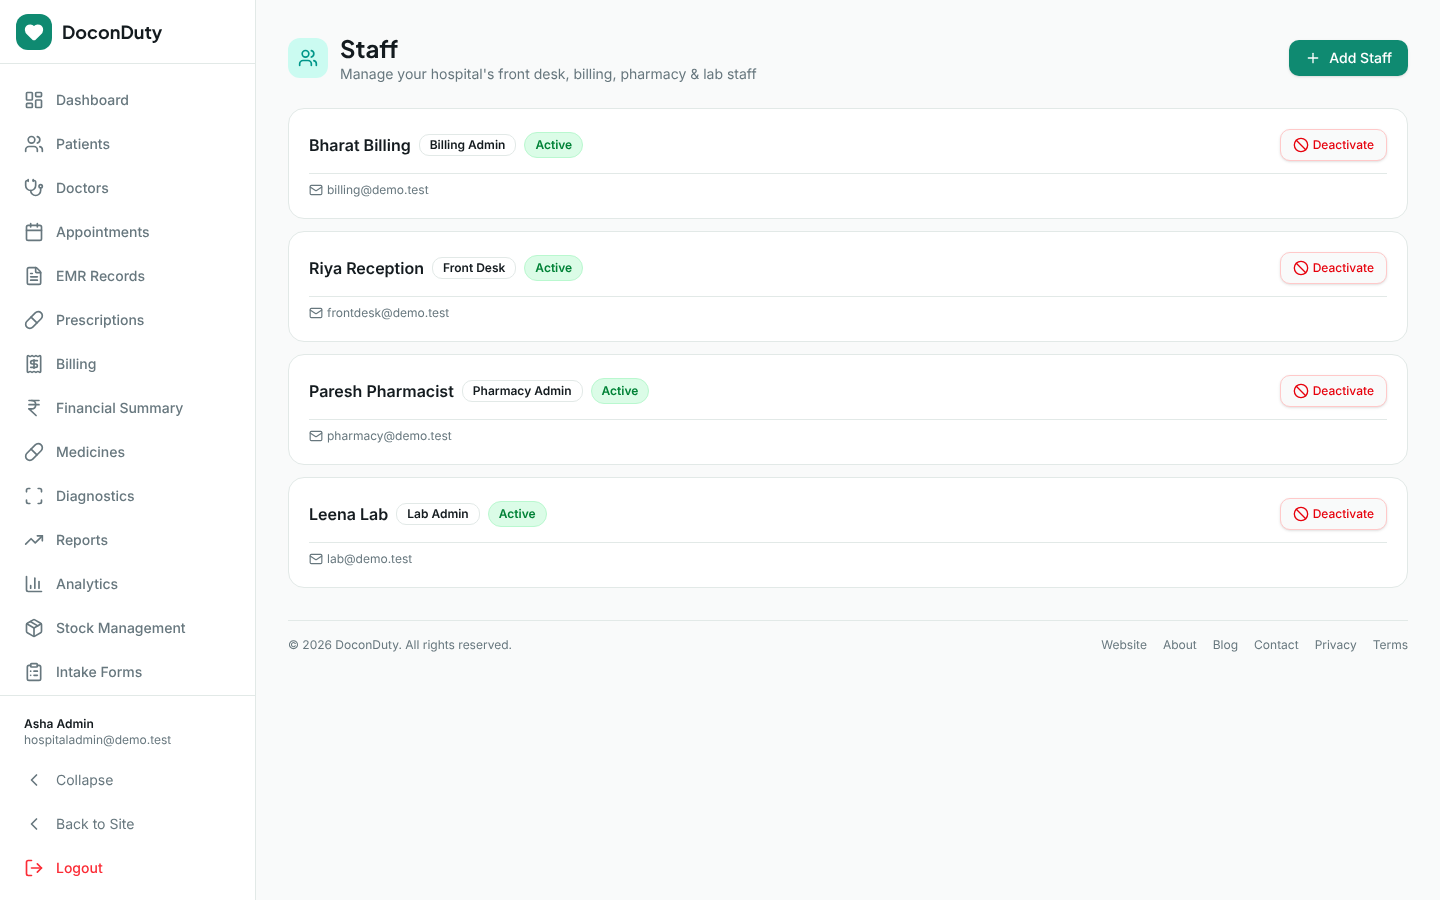
4.1 Add a staff member
Purpose: Give a new employee their own login.
Who can do this: Hospital Admin.
Before you begin: You need the person's full name and an email address that they can read and that is not already used by another DoconDuty account. Check that your subscription has room for another account of that type (see Section 15).
Steps:
- Select Staff in the sidebar.
- Select Add Staff (top right).
- Fill in Name, Email and, if you wish, Phone.
- Under Role, select one of Front Desk, Billing Admin, Pharmacy Admin or Lab Admin.
- Check the email address carefully — the login details will be sent to it.
- Select Add Staff.
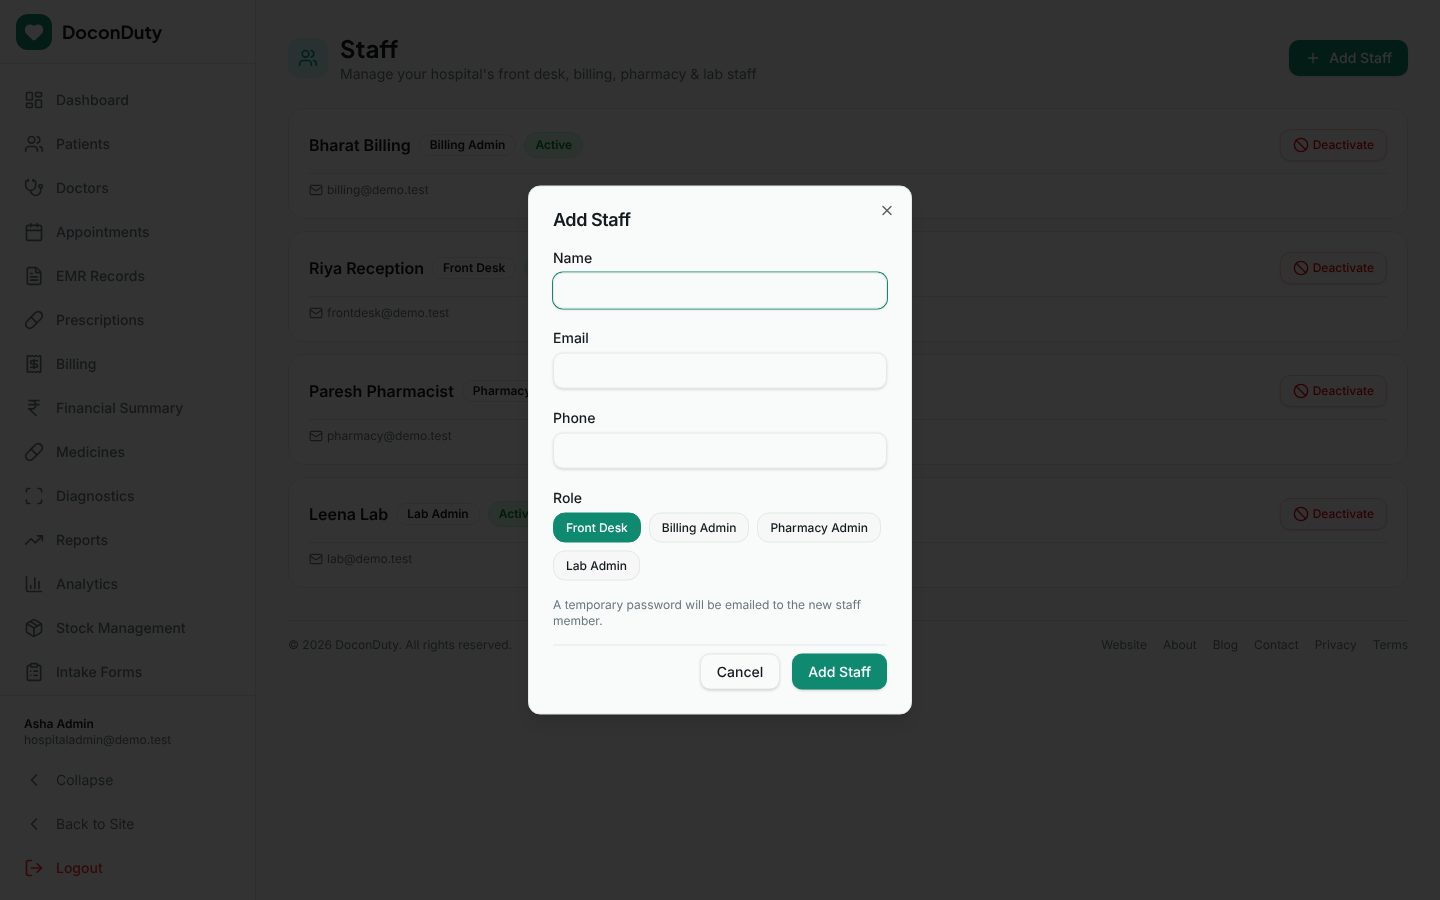
What happens next: The message Staff invited — temporary password emailed appears. The person appears in the list with the status Active, and receives an email with their login email and a temporary password. Tell them which portal to use:
| Role | Portal card on the home page |
|---|---|
| Front Desk | Front Desk Portal |
| Billing Admin | Admin Portal |
| Pharmacy Admin | Pharmacy Portal |
| Lab Admin | Lab Portal |
Common problems:
- "The email has already been taken." — that email is already used by another account. Use a different address.
- "Your current subscription allows … account(s)…" or "This hospital has no active subscription…" — see Section 15.
- The person did not receive the email — ask them to check their spam folder. If it still has not arrived, contact platform support; there is currently no button to resend the email.
Not available yet: From the Staff page you cannot edit a staff member's name or email, change their role, reset their password, or delete them. You can only add, deactivate and reactivate. Front Desk, Pharmacy and Lab staff also cannot change their own password. Contact platform support if one of these changes is needed.
4.2 Deactivate or reactivate a staff member
See Section 16.
4.3 Front Desk accounts invited by doctors
Doctors can invite a Front Desk account from their own portal (Front Desk Staff). An account created that way works exactly like one you create on the Staff page: it belongs to your hospital, has Front Desk access only (patients and appointments), appears on your Staff page where you can deactivate it, and counts towards your Front Desk subscription limit.
Note: Front Desk accounts that doctors invited before this was corrected may log in but show no patients or appointments. Contact platform support and ask them to repair those accounts; nothing needs to be re-created.
5. Managing doctors
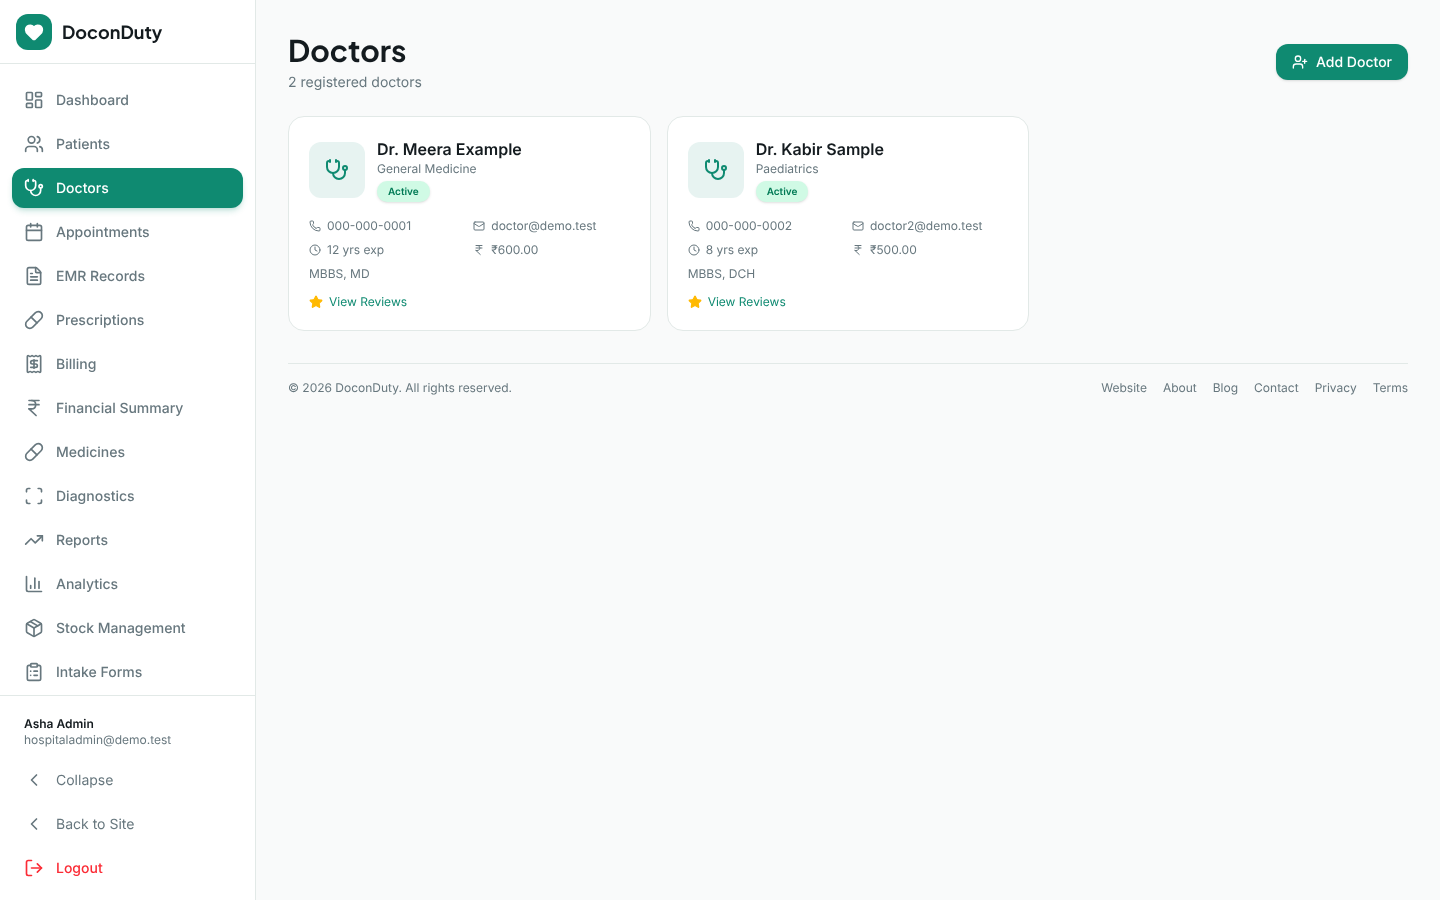
5.1 Add a doctor
Purpose: Create a doctor's profile and login.
Who can do this: Hospital Admin.
Before you begin: You need the doctor's full name, specialization and email address. Check your subscription has room for another doctor (Section 15).
Steps:
- Select Doctors in the sidebar, then Add Doctor.
- Fill in Full Name and Specialization (both required).
- Fill in Email — the doctor logs in with this address. Without an email address the doctor cannot log in.
- Fill in Phone, Qualification, Experience (yrs), Fee (₹), Slot (min), Available Days (for example
Mon,Tue,Wed) and Bio as needed. - Enter a Password (required by the form).
- Select Save Doctor.
What happens next: The message Doctor added appears and the doctor card appears with the status Active.
Important — about the doctor's first password: When you enter an email address, DoconDuty replaces the password you typed with a temporary password and emails it to the doctor. The doctor must use the emailed password. If the email does not arrive, open the doctor with the edit (pencil) button, type a new password in Password, select Save Doctor, and give the doctor the new password privately (in person or by phone — never by group chat).
Common problems: "Your current subscription allows … doctors account(s)…" — see Section 15.
5.2 Edit a doctor or set a new password
- Select Doctors.
- Move the mouse over the doctor's card and select the pencil (edit) symbol at the top right of the card.
- Change the details. To set a new password, type it in Password; leave Password blank to keep the current one.
- Select Save Doctor. The message Doctor updated appears.
Note: Doctors cannot change their own password in the Doctor Portal. Setting a new password here is the only way to help a doctor who has forgotten theirs.
5.3 Remove a doctor
Selecting the bin symbol on a doctor's card removes the doctor immediately, without asking you to confirm. Use it only for a doctor added by mistake.
Not available yet: There is no screen to mark a doctor Inactive or On Leave. If a doctor leaves, contact platform support to deactivate the account rather than removing it, so that their past appointments and prescriptions keep their doctor details.
5.4 See a doctor's reviews
Select View Reviews on a doctor's card to read patient feedback.
6. Managing patient records
Purpose: Keep accurate patient details.
Who can do this: Hospital Admin (Front Desk staff use their own simpler screen — see the Front Desk Guide).
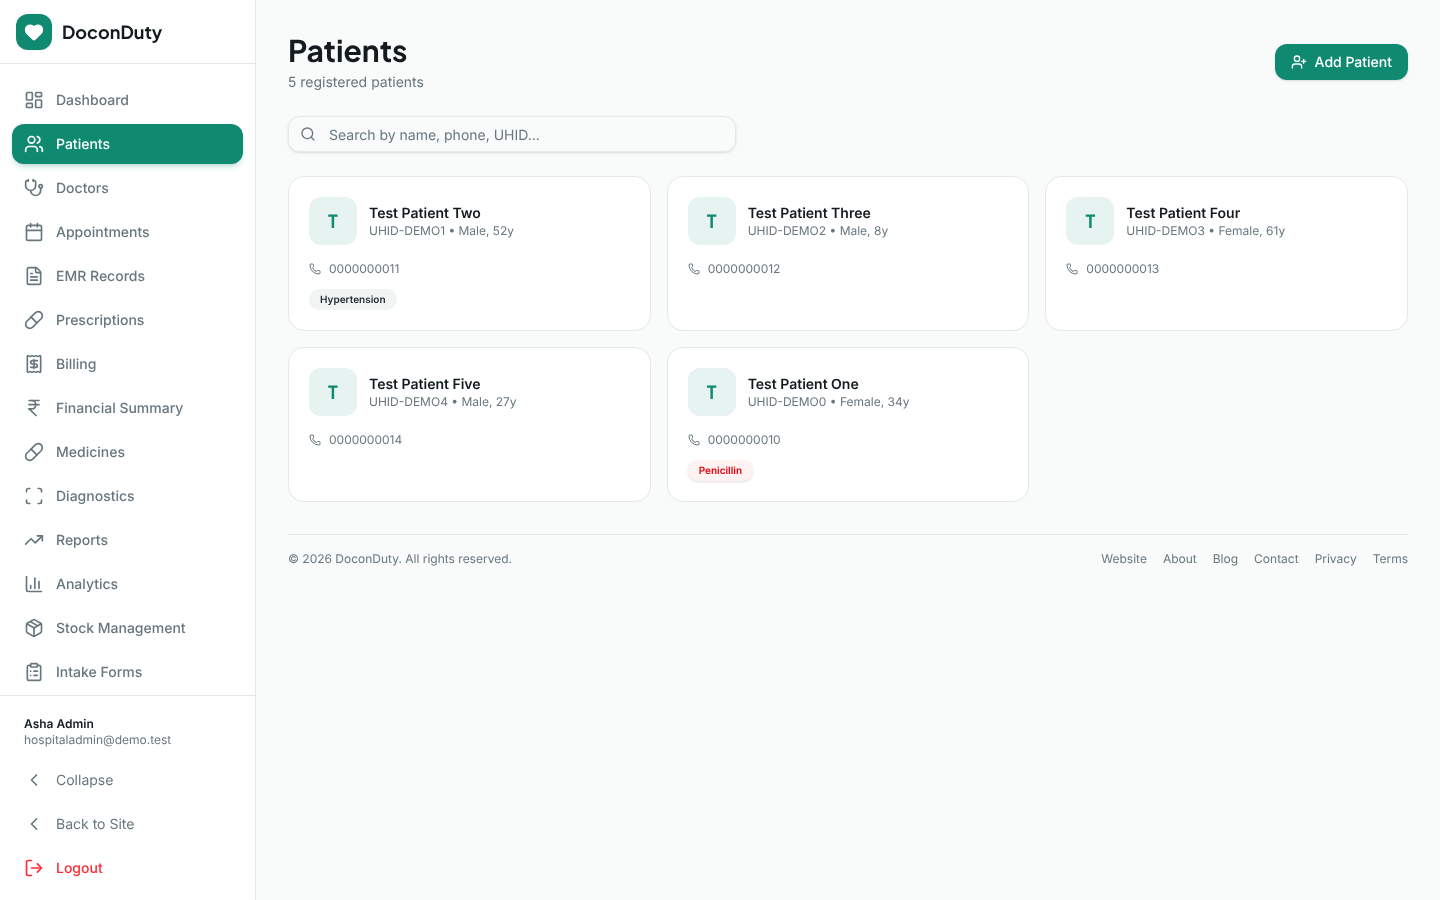
6.1 Find a patient
- Select Patients.
- Type part of the name, phone number or UHID (hospital ID number) in Search by name, phone, UHID....
6.2 Add a patient
Before you begin: Search first to make sure the patient is not already registered (see Avoiding duplicate records).
Steps:
- Select Add Patient.
- Fill in Full Name and Phone (required).
- Fill in, if known: Age, Gender, Blood Group, Email, Address, Allergies, Chronic Conditions and Emergency Contact.
- Check the spelling of the name and the phone number.
- Select Save Patient.
What happens next: The message Patient added appears. DoconDuty gives the patient a UHID automatically.
Important: Record Allergies whenever they are known. Doctors see them highlighted in red on the consultation screen.
6.3 Edit a patient and record vitals
- Find the patient and select the pencil symbol.
- Change the details and select Save Patient.
- The edit window also contains a Vitals box. Enter any readings (blood pressure, heart rate, weight, oxygen level, temperature, blood glucose) and select Record Vitals. Each new reading is added to the history; it does not overwrite older readings.
6.4 Delete a patient
The bin symbol deletes the patient immediately, without asking you to confirm. Do not delete patients who have appointments, prescriptions or bills.
Important: Change patient details only when you are sure they are wrong. Never "re-use" an old patient record for a different person.
7. Managing appointments and the queue
Who can do this: Hospital Admin. Front Desk staff and doctors also book appointments from their own portals.
7.1 Book an appointment
- Select Appointments, then New Appointment.
- Select the Patient and the Doctor.
- Choose the Date and a Time Slot (slots run from 09:00 AM to 05:00 PM).
- Choose the Type: In-Person or Follow-up.
- Type the Reason. You may also enter Height, Weight and Temp if already measured.
- Select Create Appointment.
What happens next: The message Appointment created — Confirmation sent! appears. If the patient's record has an email address, a confirmation email is sent to them.
Common problems: "This time slot is already booked." — the doctor already has an appointment at that time. Choose another slot.
7.2 Understand and change appointment status
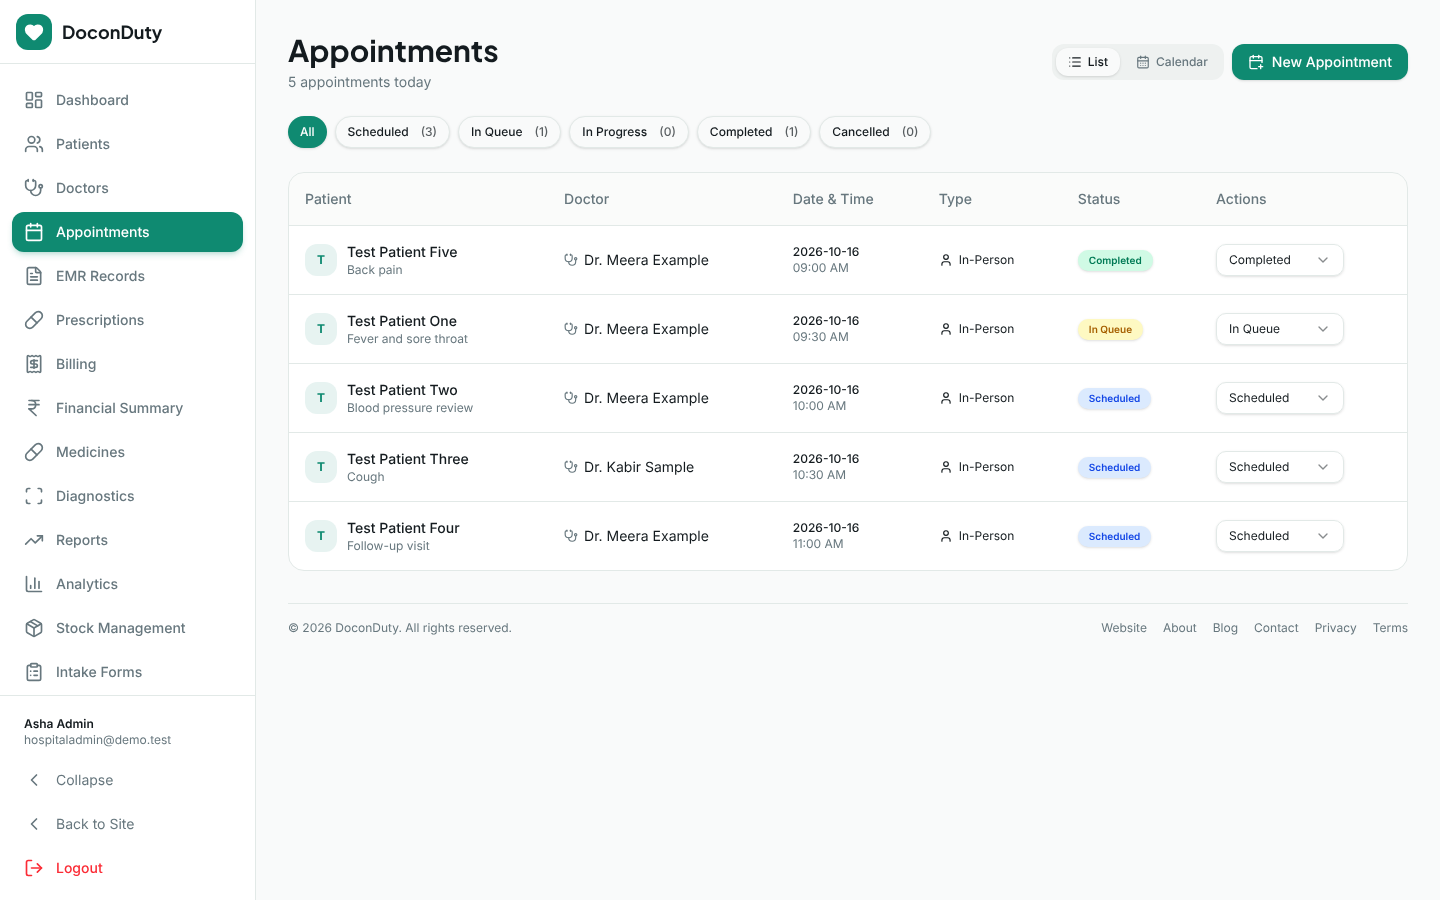
Every appointment has a status:
| Status | Meaning |
|---|---|
| Scheduled | Booked; the patient has not checked in yet. |
| In Queue | Checked in at the front desk and waiting to see the doctor. |
| In Progress | The doctor has started the consultation. |
| Completed | The visit is finished. |
| Cancelled | The appointment will not take place. |
| No Show | The patient did not come. |
To filter the list, select All, Scheduled, In Queue, In Progress, Completed or Cancelled above the list.
To change a status, open the menu in the Actions column and choose the new status.
Note: When you set an appointment to Completed here, DoconDuty automatically creates a draft (Pending) invoice for the doctor's consultation fee in Billing (if one does not already exist for that patient, doctor and date). The message Completed — Draft invoice created in Billing! confirms this. Check the invoice amount in Billing.
7.3 Cancel an appointment
Change its status to Cancelled (section 7.2). The time slot becomes free for another booking.
7.4 Reschedule an appointment
- On the Appointments page, select Calendar (next to List).
- Use the week arrows (or Today) to find the appointment.
- Drag the appointment to the new day and time. The message Appointment rescheduled confirms the change.
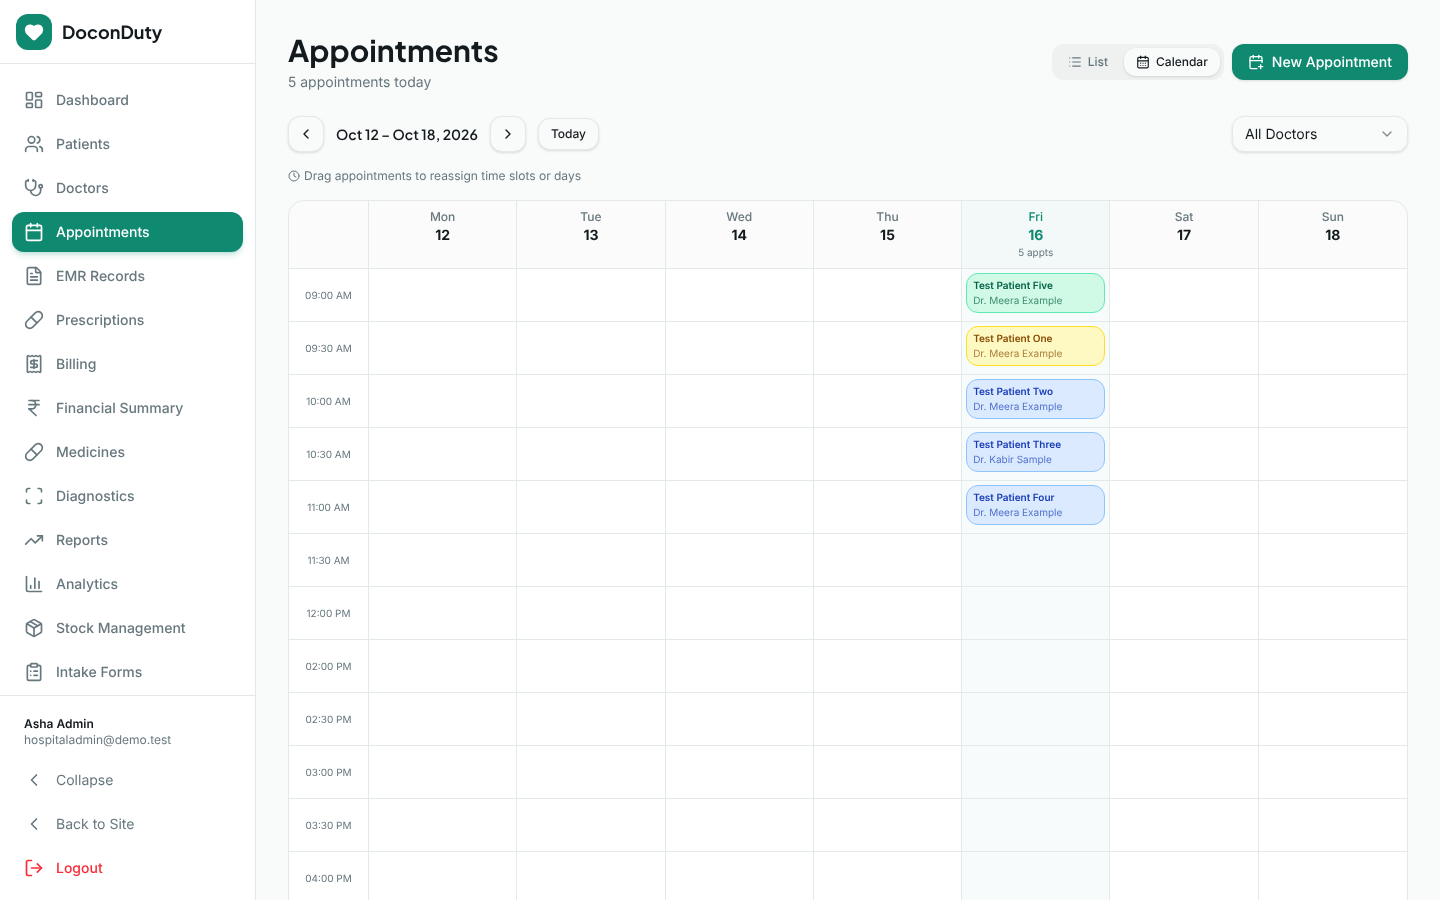
Important: Rescheduling by dragging does not check whether the doctor is already booked at the new time. Look at the calendar before dropping the appointment so that you do not double-book the doctor, and tell the patient about the new time.
8. Managing medicines (the medicine master)
The medicine master (shown as Medicine Database) is your hospital's own list of medicines. Doctors choose medicines from it when they write prescriptions, and the pharmacy uses it to track stock. Other hospitals cannot see your list.
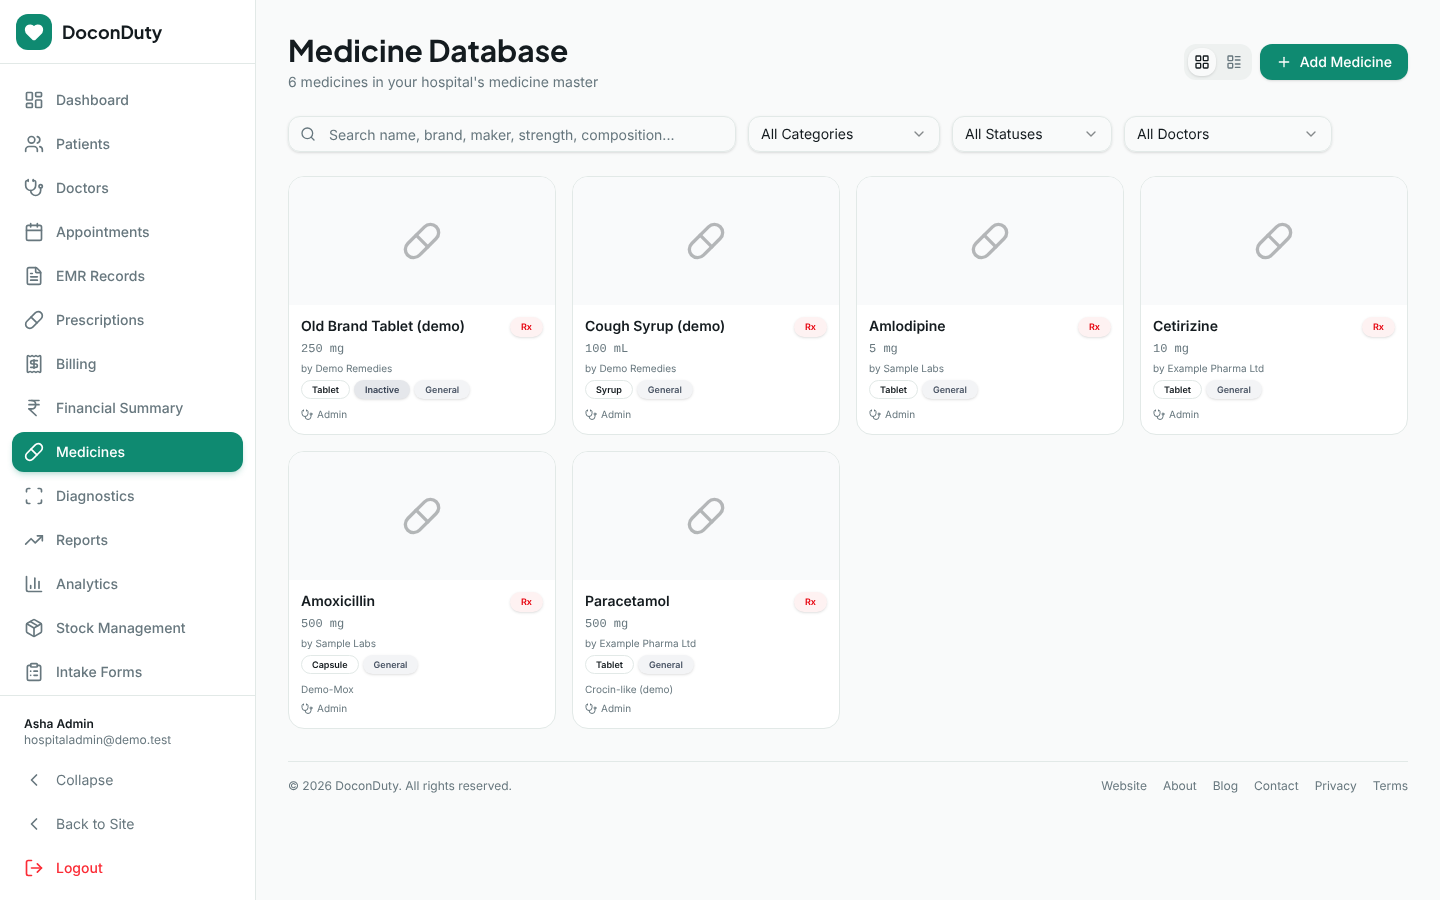
8.1 Find a medicine
- Select Medicines.
- Type in Search name, brand, maker, strength, composition..., or use the All Categories, All Statuses and All Doctors filters.
- Use the two small buttons at the top right to switch between card view and table view.
- Select a card to see full details.
8.2 Add a medicine
Before you begin: Search first. A medicine with the same name, strength, dosage form and maker cannot be added twice.
Steps:
- Select Add Medicine.
- Fill in Medicine / Generic Name (required).
- Fill in Strength (for example 500 mg or 250 mg/5 mL), Brand Names, Maker / Manufacturer, Dosage Form (Tablet, Capsule, Syrup and so on) and Category.
- Optionally choose a Doctor to attribute the medicine to, or leave Admin (No Doctor).
- Fill in Composition / Active Ingredients, Indications / Usage, Standard Dosage Info, Side Effects, Contraindications, Pack / Dispensing Unit (for example strip of 10), Storage and Requires Prescription as appropriate.
- Leave Status as Active so the medicine can be prescribed.
- Check the strength and maker carefully — they appear on prescriptions.
- Select Save Medicine at the bottom of the window.
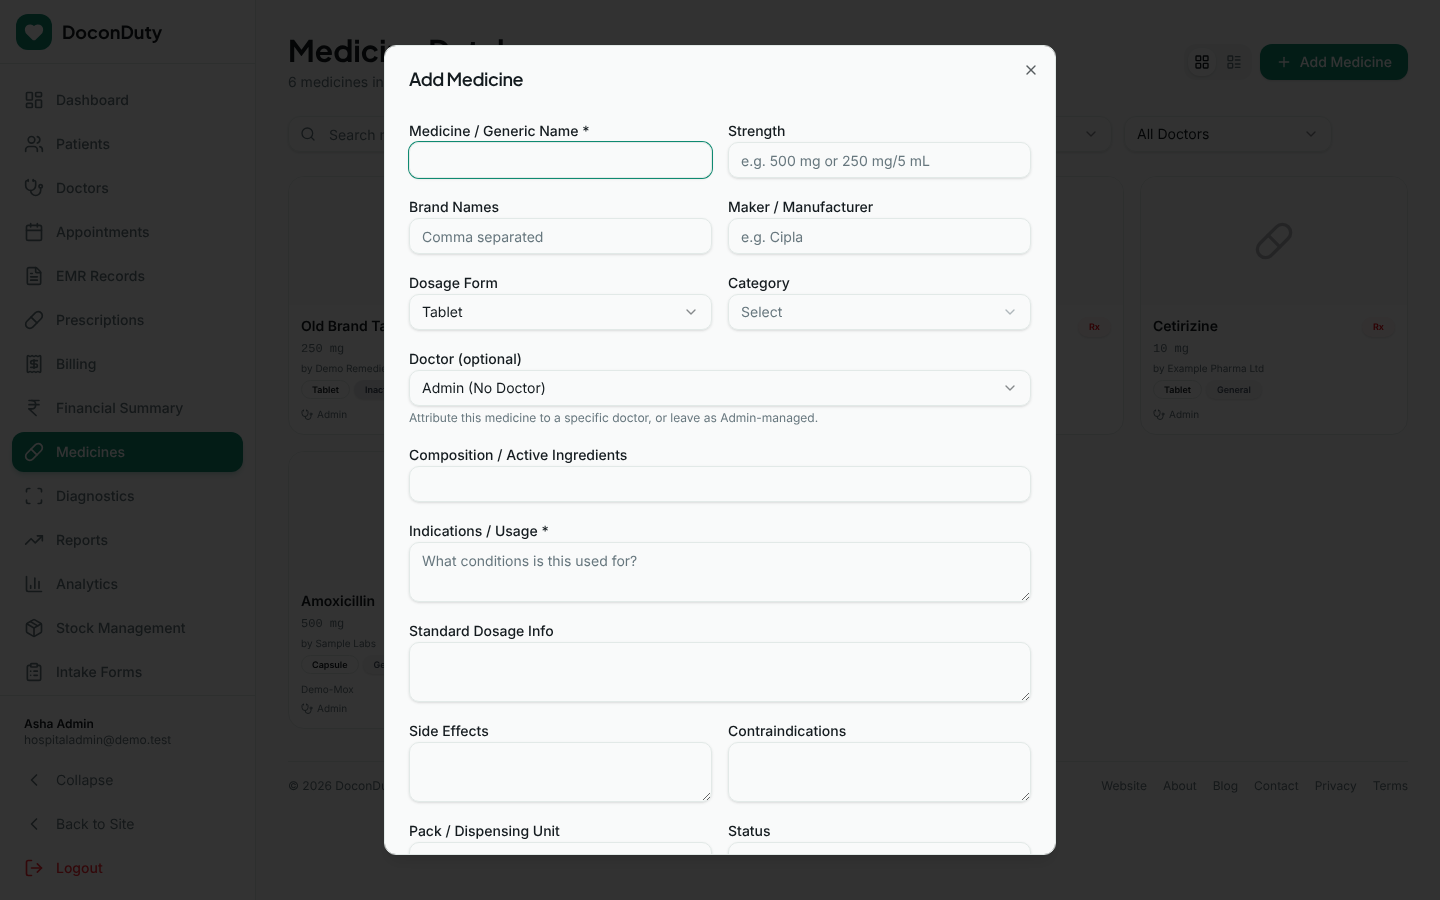
What happens next: The message Saved appears and the medicine is added to the list.
Common problems: "This medicine (same name, strength, dosage form and maker) already exists in your hospital medicine master." — search for the existing entry and use it.
Note: If your medicine master is completely empty, a Load Bulk Medicines button appears. It adds a starter list of common medicines. Review each one (especially strength and maker) before doctors use them.
Note: Medicines that doctors add in their own Medicines page also become part of your hospital's medicine master.
8.3 Edit a medicine
Move the mouse over the medicine card and select the pencil symbol. Change the details and save.
8.4 Active, Inactive and Discontinued medicines
| Status | What it means |
|---|---|
| Active | Can be found in prescription search and prescribed. |
| Inactive | Hidden from prescription search; cannot be added to new prescriptions or dispensed. Old prescriptions are not changed. |
| Discontinued | Same effect as Inactive — use it when the product is no longer made. |
To stop a medicine from being prescribed, edit it and change Status to Inactive or Discontinued. This keeps the record for past prescriptions.
Important: The bin symbol on a medicine card (and Delete Selected after ticking several cards) deletes medicines immediately, without asking you to confirm. Prefer marking a medicine Inactive instead of deleting it.
Note: Prescriptions always keep a copy of the medicine's name, strength, form and maker as they were when prescribed. Editing or deactivating a medicine later never changes an old prescription.
9. Managing stock
Purpose: Keep medicine stock levels correct so that dispensing and low-stock alerts work.
Who can do this: Hospital Admin. Pharmacy staff can also update stock from the Pharmacy Portal.
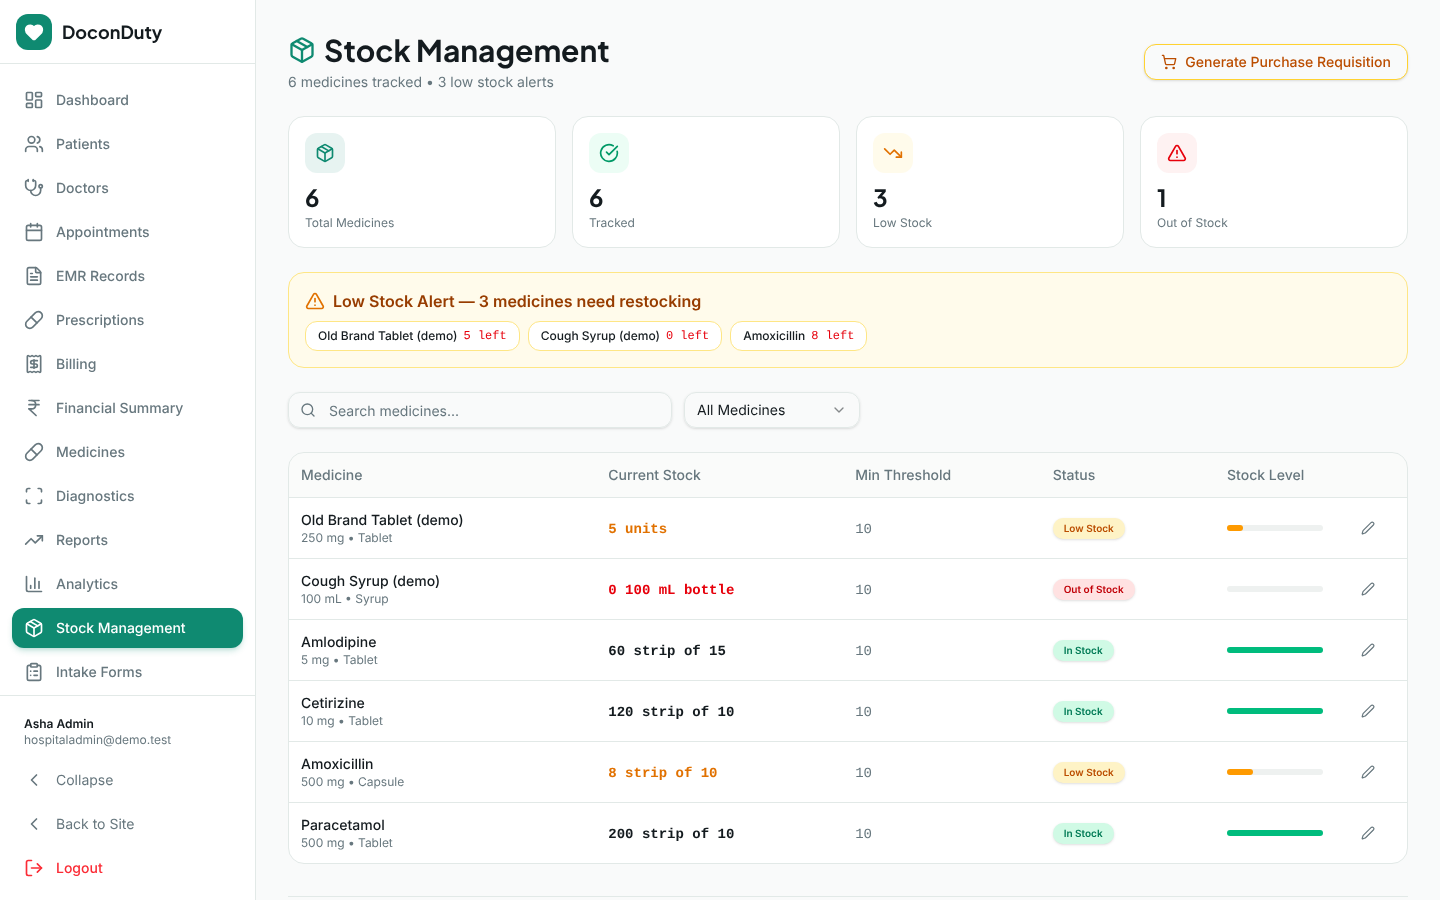
9.1 Update a medicine's stock
- Select Stock Management.
- Use the search box or the filter (All Medicines, Tracked Only, Low Stock, Out of Stock) to find the medicine.
- Select the pencil symbol at the end of the row.
- Enter the Current Stock (the number you physically have) and the Minimum Threshold (the level at which you want a low-stock warning). Choose the Unit.
- Select Update Stock.
Note: The Unit chosen here replaces the medicine's Pack / Dispensing Unit. Choose the unit that matches how you count the stock.
Important: Stock is counted in the same unit that prescriptions use for Qty. If you count in strips, ask doctors and pharmacy staff to enter quantities in strips too.
9.2 Purchase requisitions
When medicines are low, a Generate Purchase Requisition button appears. It shows a suggested order list.
Not available yet: Selecting Approve & Send in that window shows the message "PR sent to procurement!" but nothing is actually sent or saved. Write down or photograph the list and place the order through your usual purchasing process.
10. Prescriptions, templates and dispensing
Doctors normally write prescriptions in the Doctor Portal (see the Doctor Guide). The Prescriptions page in the Admin Portal lets authorised staff view all of the hospital's prescriptions, record a prescription on a doctor's behalf, dispense medicines from stock, use prescription templates, and handle refill requests.
Important: Only record a prescription here when a doctor has made and confirmed the clinical decision. The person entering it is responsible for copying the doctor's instructions exactly.
10.1 Create a prescription and dispense from stock
- Select Prescriptions, then New Prescription.
- Optionally select a template (see 10.2) — it fills in the diagnosis, symptoms, medicines and advice for you to review.
- Select the Patient and the Doctor (both required). Check the Date and set a Follow-up Date if needed.
- Enter Vitals, Diagnosis and Symptoms as needed.
- Under Medicines, in each row:
- type in Search medicine... and choose the medicine from the list (the list shows strength, form, maker and Stock);
- fill in Dosage, Frequency, Duration, Qty and Instructions (optional). Select Add Row for another medicine. Select the bin symbol to remove a row.
- Decide whether to tick Dispense from pharmacy stock:
- Ticked (the default): each medicine chosen from the list is taken out of stock by its Qty (1 if Qty is blank). Medicines typed by hand (not chosen from the list) never change stock.
- Not ticked: the prescription is saved without changing stock.
- Fill in Advice. When a patient and doctor are selected, a Clinical Notes box also appears where you can add a note to the patient's records.
- Review every medicine, dose and quantity, then select Save Prescription.
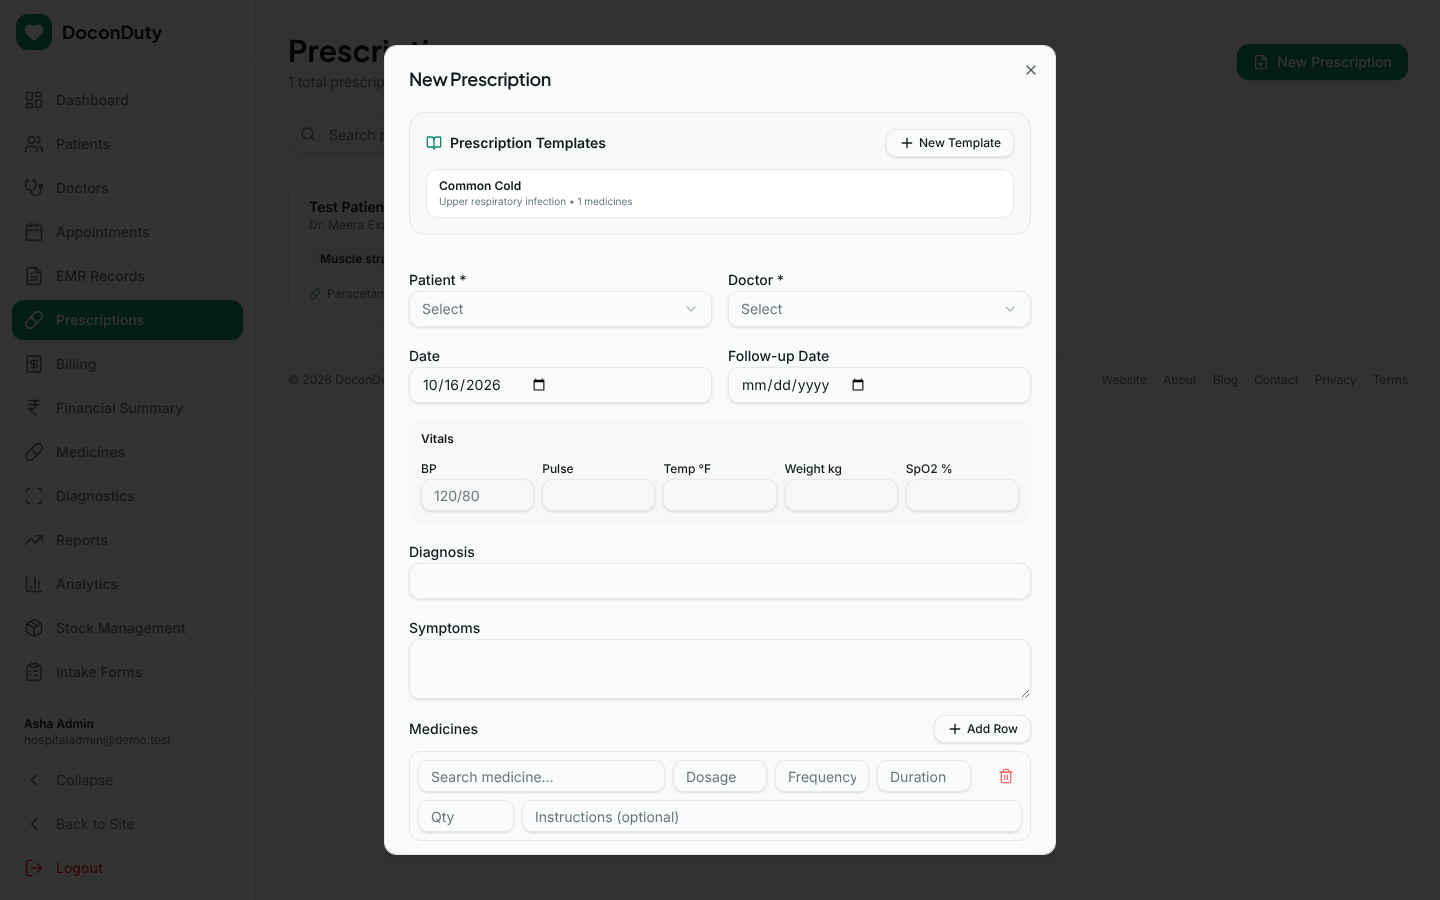
What happens next: The message Prescription created · stock updated for N medicine(s) (or Prescription created if nothing was dispensed) appears. In Prescription Details, dispensed medicines show Dispensed from stock: N.
Common problems:
| Message | What to do |
|---|---|
| Insufficient stock for [medicine]: X requested, Y available. | Nothing has been saved. Reduce the quantity, choose another medicine, untick Dispense from pharmacy stock, or update stock first if the count is wrong. |
| [medicine] is inactive and cannot be added to a new prescription. | Choose an active medicine instead. |
| Select patient and doctor | Choose both before saving. |
10.2 Prescription templates
A template is a saved set of diagnosis, symptoms, medicines and advice for a common condition (for example "Common Cold"), so it does not have to be typed every time.
- Create: in the New Prescription window, select New Template in the Prescription Templates box. Enter Template Name (required), Doctor, Diagnosis, Follow-up (days), Symptoms, the medicines (chosen from the medicine master) and Advice, then select Save Template.
- Use: select Use next to a template. The message "Template … applied — review the medicines before saving." appears.
- Edit / delete: use the pencil and bin symbols next to the template. Deleting happens without confirmation.
Important: A template is only a starting point. Always review and adjust every medicine, dose and duration for the individual patient before saving. If a template contains a medicine that is no longer active, a warning appears and the row shows "No longer active in the medicine master — choose a replacement or remove this row."
Note: Templates are available in the Admin Portal Prescriptions page only. Doctors do not currently see templates in the Doctor Portal.
10.3 Refill requests
When patients ask for a repeat of a prescription, a yellow Pending Refill Requests box appears at the top of the Prescriptions page. Select Approve (which creates a new prescription) or Reject. Only approve a refill with the prescribing doctor's agreement.
10.4 View, print or delete prescriptions
Use the search box to find a prescription and select it to see Prescription Details. From there you can also refer the patient to the lab. Deleting prescriptions (tick several, then Delete) happens without confirmation — do not delete clinical records.
11. Billing
Who can do this: Hospital Admin and Billing Admin.
-
Select Billing. The top of the page shows totals for paid and pending invoices.
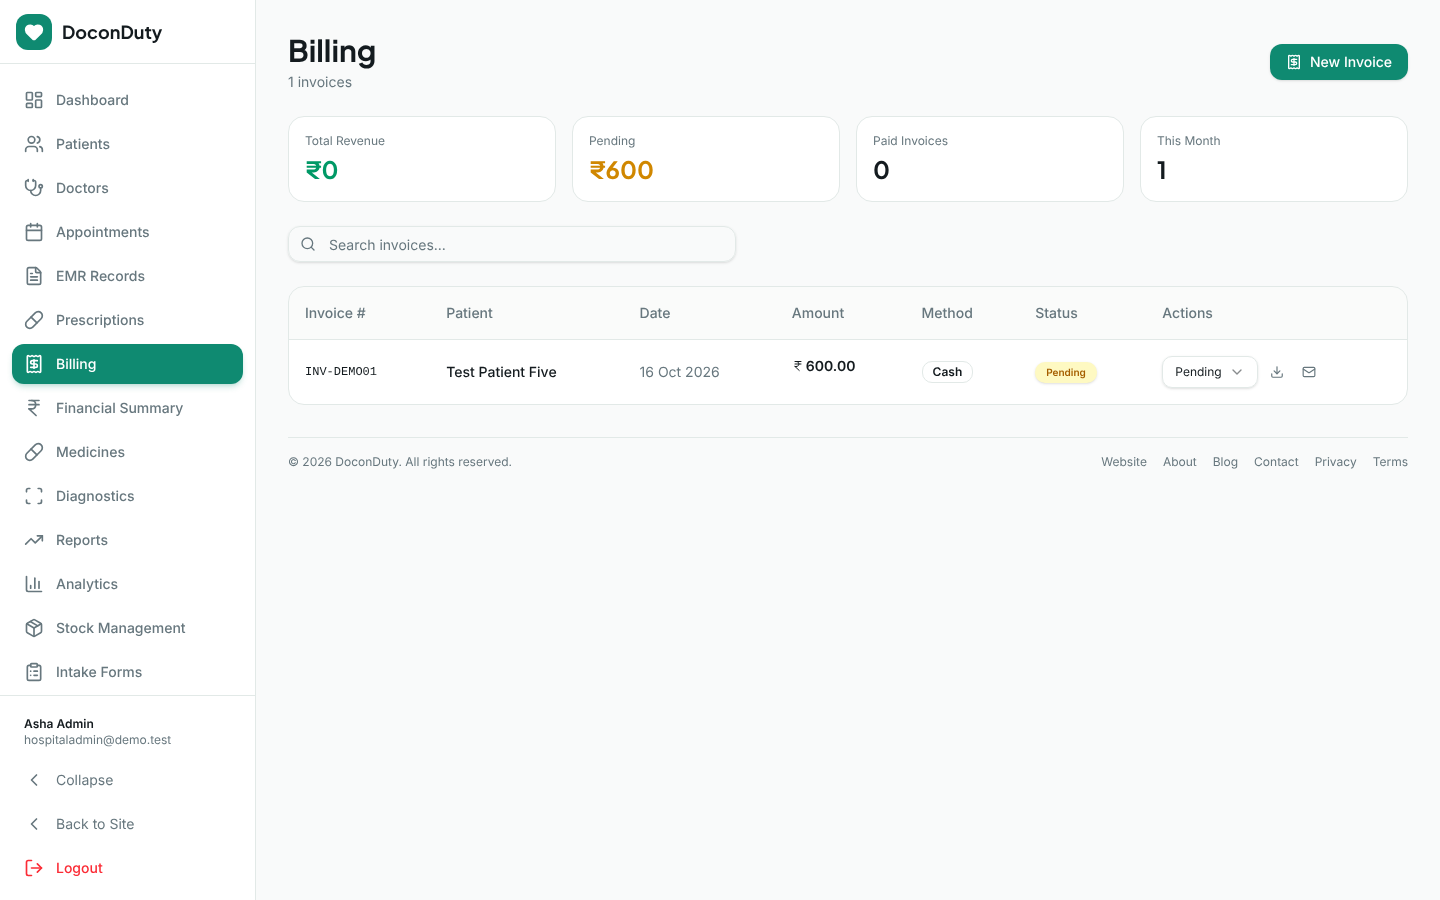
Figure 12 — Billing. -
To create an invoice, select New Invoice, choose the Patient (and Doctor if relevant), add the Items (description, quantity, rate), enter any Discount (₹), choose the Payment Method (Cash, Card, UPI, Insurance, Online) and select Create Invoice. New invoices start as Pending.
-
To record payment, change the invoice's status in the list to Paid (or Partial or Cancelled).
Not available yet: Marking an invoice Paid (message: Marked Paid) only records the payment. No payment receipt email is sent. To send the patient their invoice, use the envelope symbol (step 4).
-
Use the download symbol for a PDF copy and the envelope symbol to email the invoice to the patient.
Note: DoconDuty records payments; it does not collect money online. Mark an invoice as Paid only after you have actually received the payment.
12. Laboratory tests
Who can do this: Hospital Admin. Lab staff use the Lab Portal (see the Laboratory Guide).
- Select Lab Tests in the sidebar (the page is titled Lab Management).
- To order tests, select Order Lab Test, choose the patient and the ordering doctor, set the Priority (Routine, Urgent or STAT), add the tests and any Clinical Notes, then select Order Tests.
- The Test Orders tab lists orders. Change an order's status with its menu, or select Report on an order to record results. In the upload window, fill in the results, summary and Doctor's Interpretation, attach a PDF if you have one, then select Submit Report & Notify Patient.
- The Reports tab lists finished reports. Select View to read one, or To Records to add it to the patient's medical records.
13. Other modules in the menu
The following menu items are available to Hospital Admins. They are not described step by step in this edition of the guide; their screens include on-screen labels and buttons. Most of them relate to information that patients enter through the Patient Portal.
| Menu item | What it shows or does |
|---|---|
| EMR Records | Medical records for patients, including uploaded files. |
| Financial Summary | Earnings, payment trends and an insurance overview, based on invoices and claims. |
| Diagnostics | Diagnostic reports, with options such as Mark Normal. |
| Reports and Analytics | Statistics and charts about patients, appointments, prescriptions and revenue. |
| Intake Forms | Create questionnaires for patients (Create Form, Add Question) and view Responses. |
| Dr. Availability | Set doctors' weekly schedules and Block dates. |
| Pharmacy | Pharmacy orders created from prescriptions, with delivery status and Notify. |
| Notifications | A log of notifications and emails sent. |
| Dr. Performance | Appointment activity and patient ratings per doctor. |
| Waitlist | Patients waiting for a slot (Add to Waitlist, Confirm Booking). |
| Insurance Claims | Claims submitted by patients. |
| Treatment Plans | Long-term care plans (New Plan, Add Goal). |
| Emergency Alerts | Emergency alerts raised by patients. |
| Dr. Marketplace | Doctor listings shown to patients in the Patient Portal. |
Note: Video consultations have been discontinued. Appointments can only be In-Person or Follow-up.
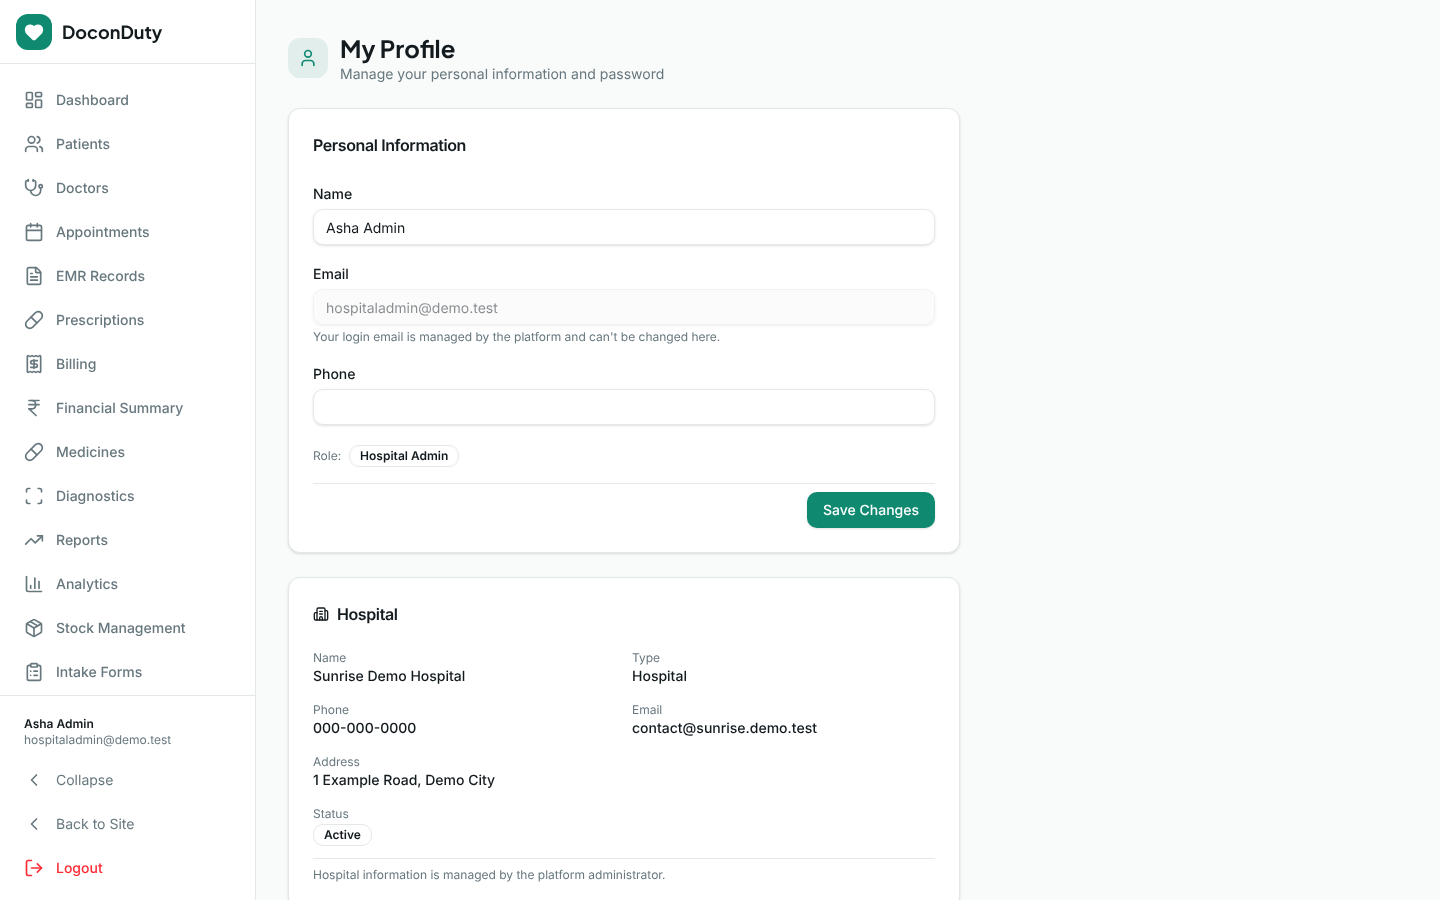
14. Your profile and password
- Select My Profile.
- In Personal Information, change your Name or Phone and select Save Changes. Your login Email cannot be changed here.
- The Hospital box shows your hospital's details. These are managed by the platform administrator.
- To change your password, use the Change Password box (see Getting Started).
15. Subscription limits
Your hospital's subscription plan (set by the platform operator) decides how many active accounts of each type you can have: Doctors, Front Desk, Billing, Pharmacy and Lab.
- Deactivated (inactive) accounts do not count towards the limit.
- If you reach a limit, adding another account shows a message such as: "Your current subscription allows 2 front desk account(s). You currently have 2 active. Please contact the platform administrator to upgrade your subscription."
- If your hospital has no current subscription (or it has expired, been suspended or cancelled), you will see: "This hospital has no active subscription. Please contact the platform administrator."
What to do: Deactivate an account that is no longer used, or contact platform support to change your plan. You cannot change your own subscription.
16. Activating and deactivating accounts
Purpose: Stop a person from using DoconDuty (for example when they leave), without deleting their history.
Who can do this: Hospital Admin, for Front Desk, Billing, Pharmacy and Lab staff.
Steps:
- Select Staff.
- Find the person and select Deactivate. Their status changes to Inactive and the message Staff status updated appears.
- To allow them back, select Activate.
What happens next: A deactivated person cannot log in and is blocked straight away even if they are already logged in. They see "This account has been deactivated."
Important: Deactivate accounts on the day a person leaves your hospital. Never share one person's login with their replacement — create a new account instead.
Not available yet: Doctors cannot be deactivated from the Doctors page (see Section 5.3).
Related: Front Desk Guide · Doctor Guide · Pharmacy Guide · Laboratory Guide · Troubleshooting