This guide follows a doctor's normal working day in the Doctor Portal: logging in, seeing who is waiting, consulting, prescribing, printing and finishing the visit. Read Getting Started first.
Important — clinical responsibility. DoconDuty records what you decide. It does not suggest diagnoses or medicines, check doses, or warn about drug interactions. The prescribing doctor must choose and confirm every medicine, dose, frequency, duration, quantity, route and instruction. Medicine information in the medicine master (strength, maker, usage notes) is entered by your hospital's staff and may contain mistakes — always use your clinical judgement.
1. Log in
- Open your DoconDuty website and scroll to Choose Your Portal.
- Select Login to Portal on the Doctor Portal card.
- Enter your Email and Password and select Login as Doctor.
What happens next: The message Doctor logged in successfully! appears and your dashboard opens.
Note: Your first password is emailed to you when your Hospital Admin creates your account. There is no screen for doctors to change their password yet; ask your Hospital Admin if you need a new one.
2. Your dashboard
The dashboard answers the question "who do I see next?".
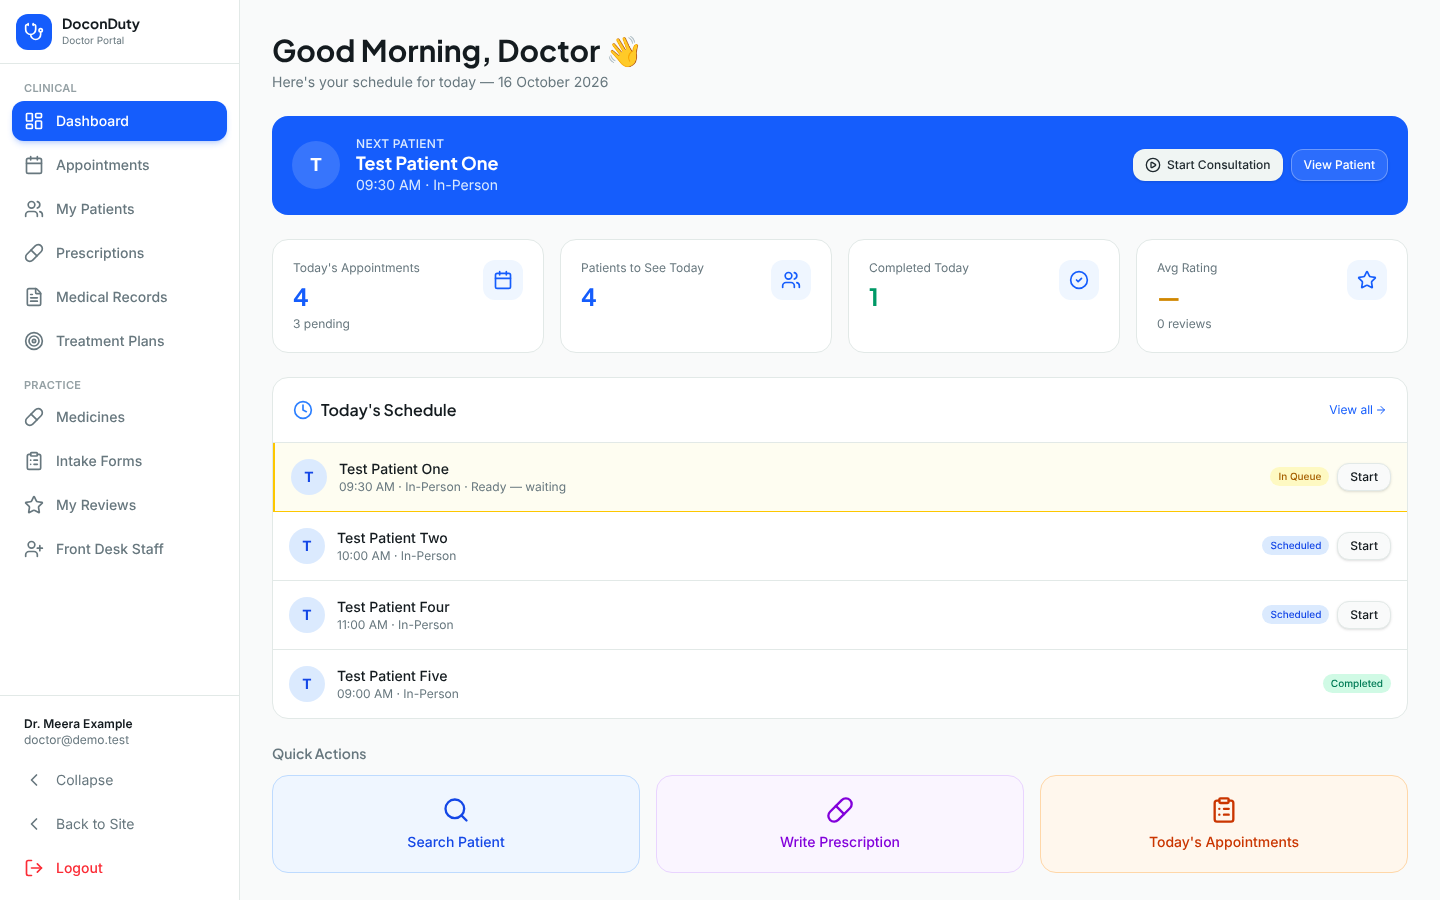
- Next Patient (blue banner) — the patient to see now, with Start Consultation and View Patient buttons. Patients already checked in by the front desk (In Queue) come first.
- Summary cards — Today's Appointments, Patients to See Today, Completed Today and Avg Rating.
- Today's Schedule — every appointment for today. Rows highlighted in yellow and marked Ready — waiting are patients who have checked in.
- Quick Actions — Search Patient, Write Prescription and Today's Appointments.
The left sidebar has two groups:
- Clinical: Dashboard, Appointments, My Patients, Prescriptions, Medical Records, Treatment Plans.
- Practice: Medicines, Intake Forms, My Reviews, Front Desk Staff.
3. Find the patients waiting for you
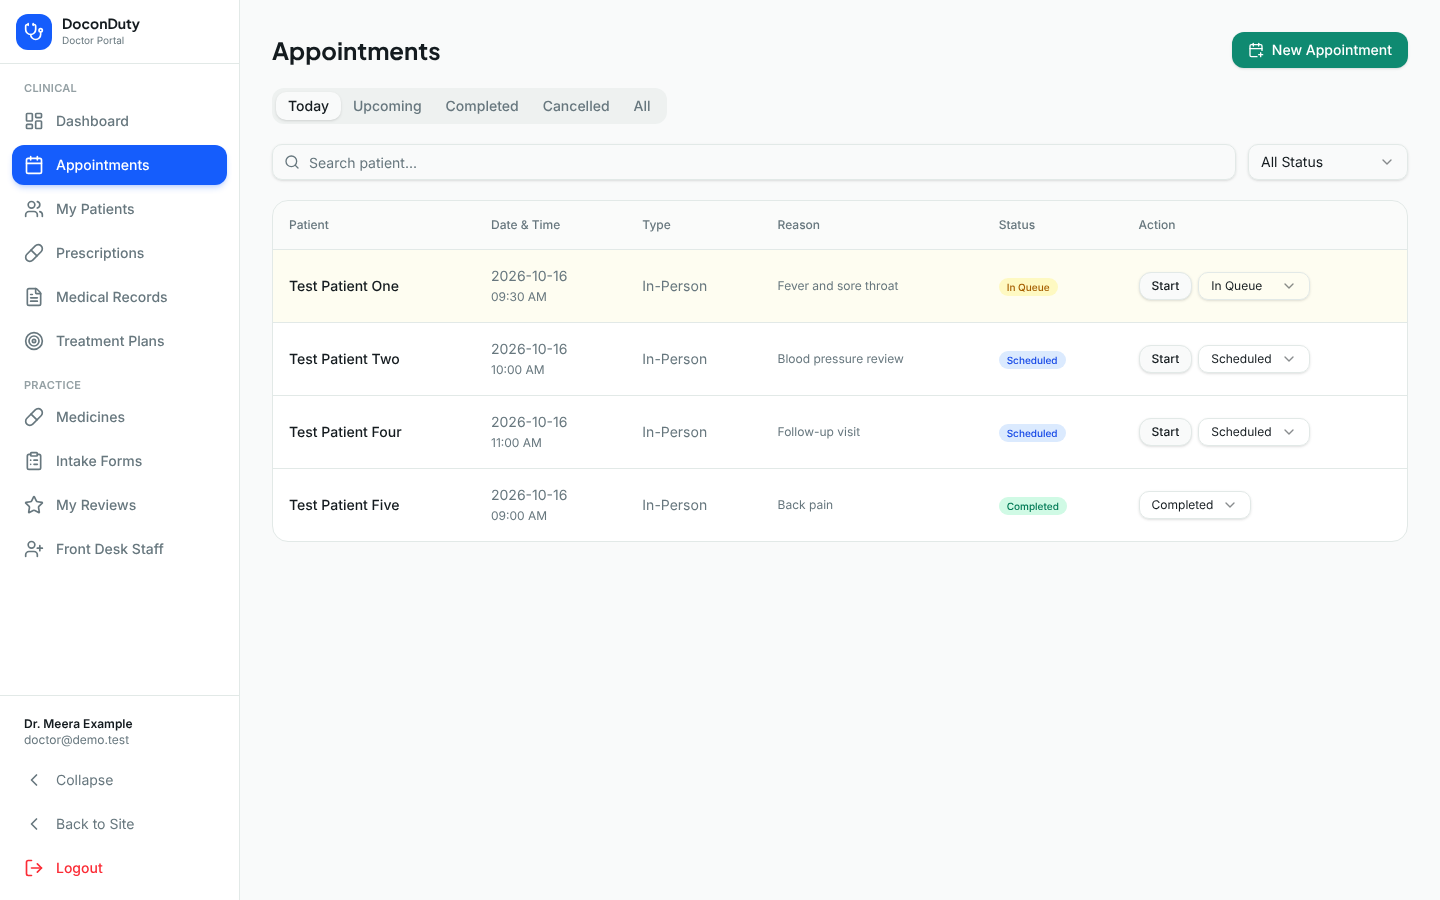
- Look at Today's Schedule on the dashboard, or select Appointments in the sidebar.
- On Appointments, choose a view: Today, Upcoming, Completed, Cancelled or All. You can also search by patient name and filter by status.
| Status | Meaning for you |
|---|---|
| Scheduled | Booked, not yet checked in at the front desk. |
| In Queue | Checked in and waiting — usually with vitals already recorded. |
| In Progress | You have started the consultation. |
| Completed | The visit is finished. |
| Cancelled / No Show | The patient will not be seen. |
4. Open the correct patient
- To consult, select Start Consultation (on the Next Patient banner) or Start (on an appointment row). This opens the consultation screen for that appointment.
- To look up a patient without starting a visit, select View Patient, the patient's name, or My Patients → the patient card.
Important — check the patient's identity. The top of every patient screen shows the patient's name, age, gender, patient number and phone number. Confirm these with the patient before you record anything or prescribe. Patients with similar names are a common source of error.
5. Review the patient's information
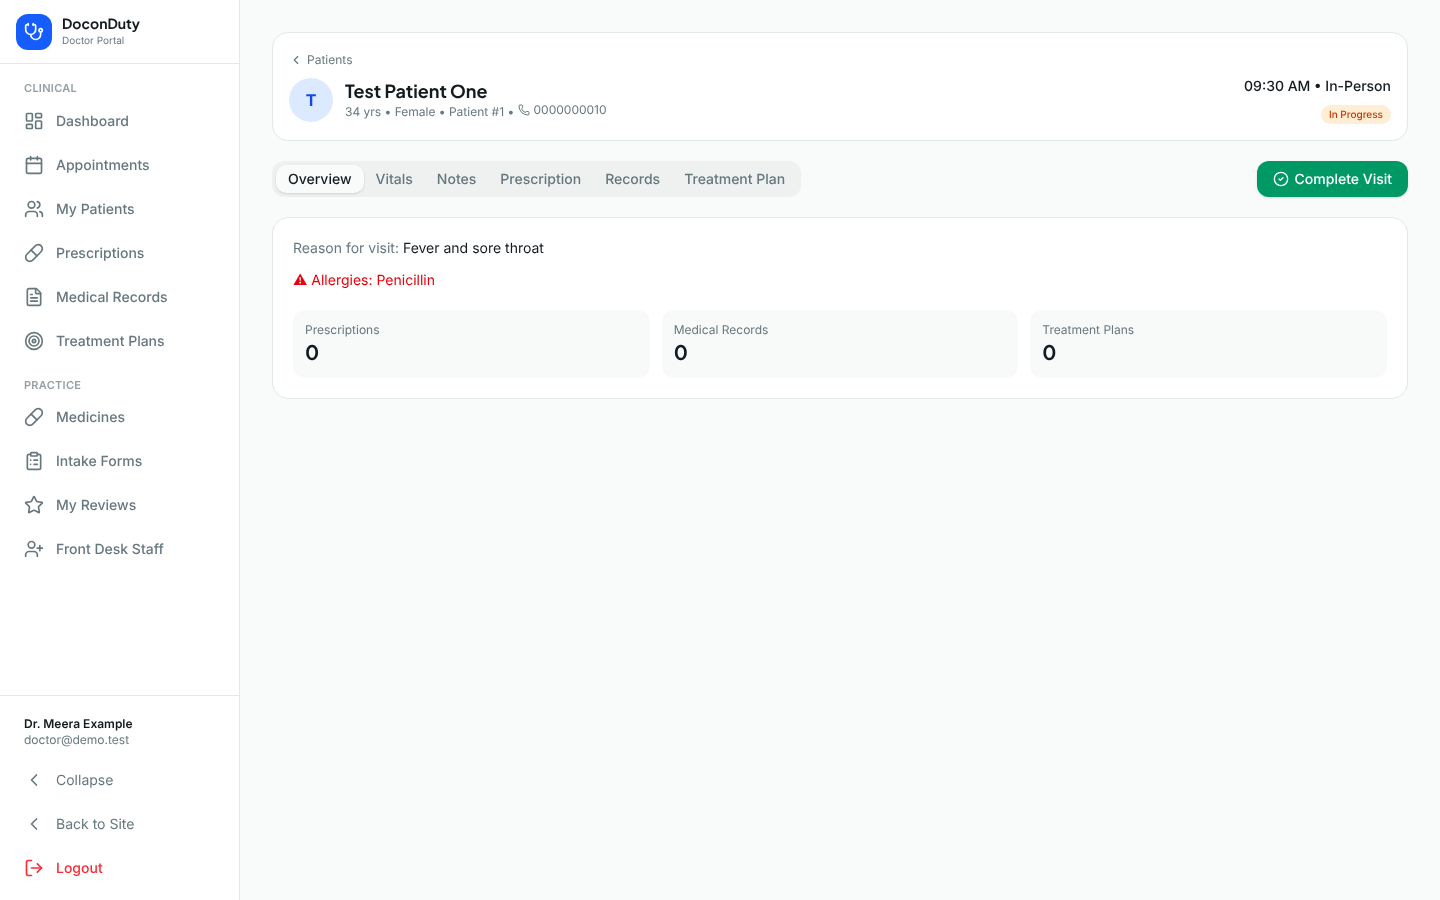
The consultation screen has a header with the patient's details and the appointment time and status, and these tabs:
| Tab | What you see |
|---|---|
| Overview | Reason for visit, Allergies (shown in red with a warning symbol), Chronic Conditions, and how many prescriptions, records and treatment plans the patient has. |
| Vitals | The latest vital signs (often recorded by the front desk at check-in) and earlier readings. |
| Notes | The chief complaint / reason for visit and any clinical notes already on the appointment. |
| Prescription | Previous prescriptions and the new-prescription form. |
| Records | Medical records and files (select View File to open a file). |
| Treatment Plan | The patient's treatment plans and progress. |
Note: If the appointment was booked without linking it to a registered patient, a message explains that Vitals, Records and Treatment Plans are not available for it. The Prescription tab still works.
6. Start the consultation
Opening the consultation screen for a Scheduled or In Queue appointment automatically changes its status to In Progress. The front desk and dashboard update accordingly. You do not need to press anything else to "start".
7. Record vitals, symptoms, diagnosis and notes
Vitals
- Open the Vitals tab.
- Enter any readings: systolic and diastolic blood pressure, heart rate, weight (kg), SpO2 (%), temperature (°F) and blood glucose.
- Select Record / Correct Vitals. The message Vitals recorded appears.
A new reading is always added to the history; earlier readings are never overwritten. To correct a mistake, record the correct values again.
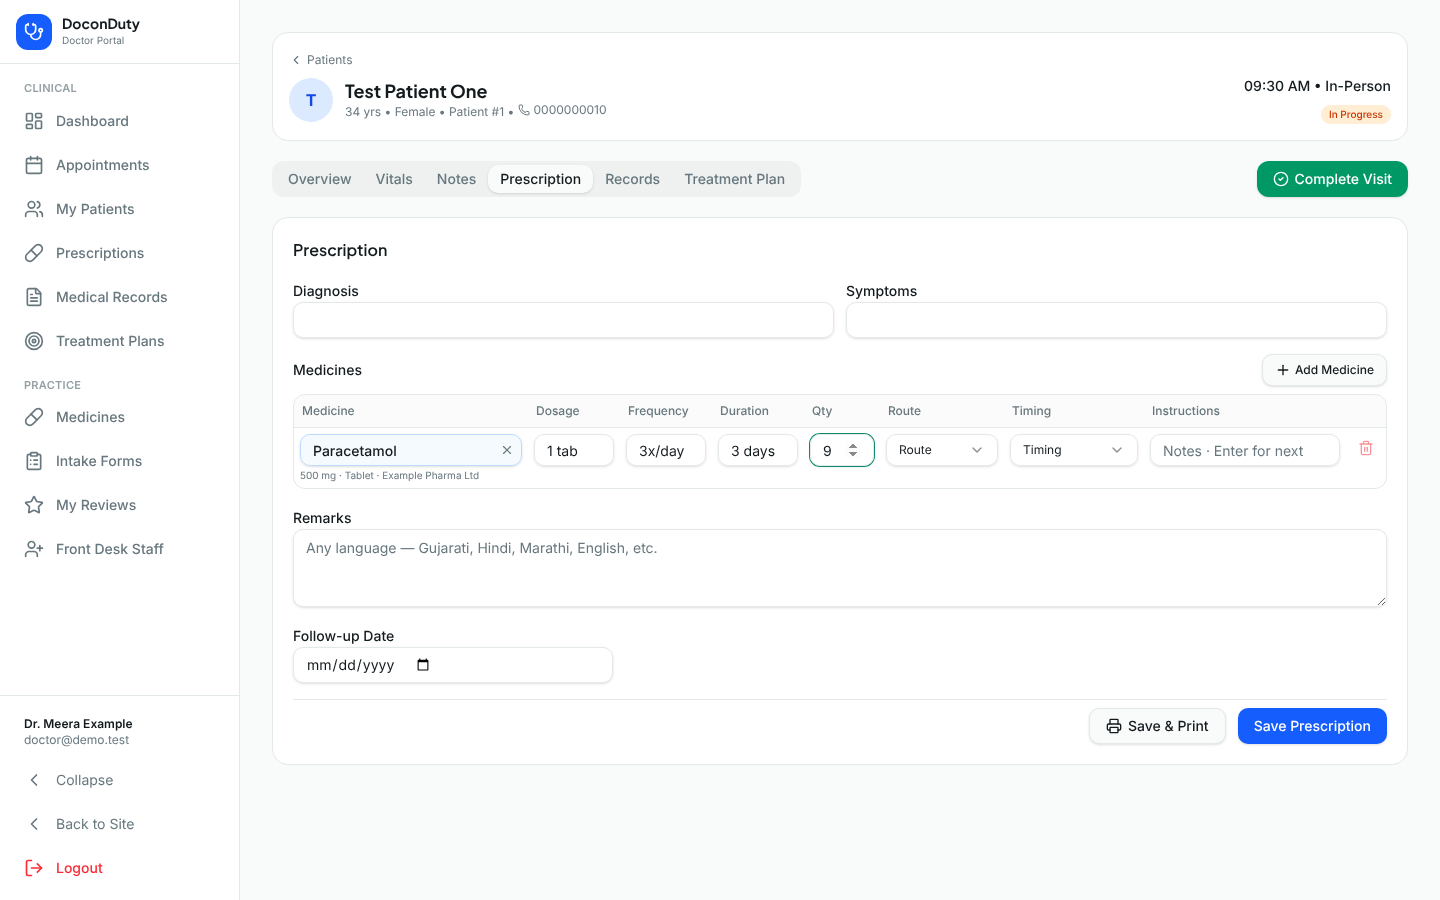
Symptoms and diagnosis are entered in the Prescription tab (Symptoms and Diagnosis boxes) and are printed on the prescription.
Advice and remarks go in the Remarks box of the prescription. You can write in any language, for example Gujarati, Hindi, Marathi or English.
Not available yet: The Notes tab is read-only. Typing new free-text clinical notes into the appointment is not available in this version. Use Diagnosis, Symptoms and Remarks on the prescription for information that must be recorded.
8. Add medicines with the medicine search
Medicines are chosen from your hospital's medicine master — the list of medicines your hospital has set up.
- Open the Prescription tab.
- In the Medicines table, select the Medicine box (it says Search medicine…).
- Type at least part of the medicine name. You can also search by brand name, maker, strength or composition.
- A list appears under the box. Each result shows the name and strength on the first line, and the dosage form, maker and brand names underneath.
- Select the correct medicine (or use the ↓ and ↑ arrow keys and press Enter).
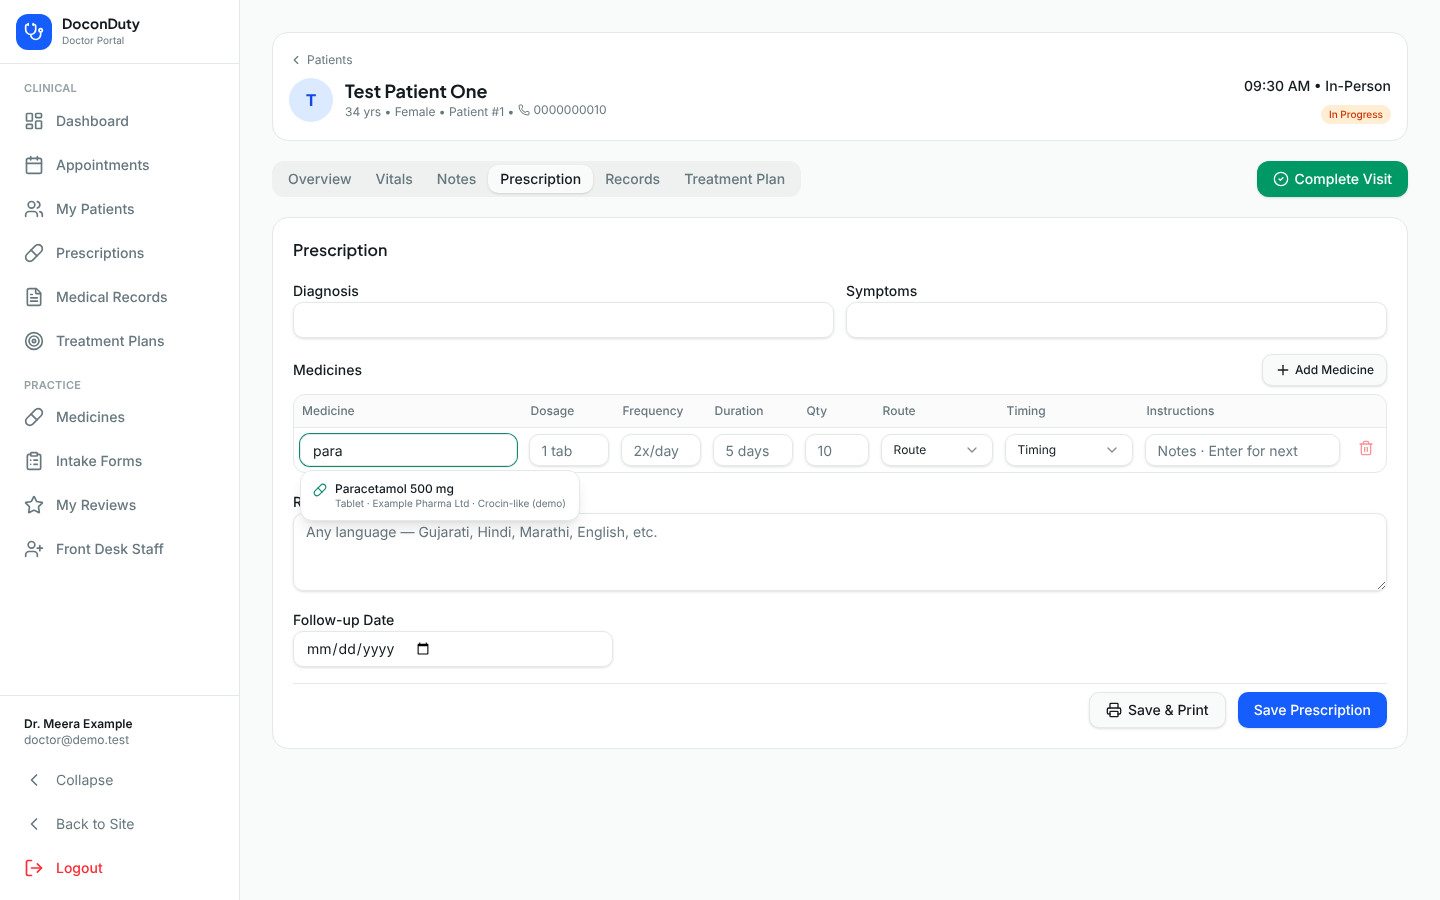
What happens next: The box turns blue and shows the medicine name, with the strength, form and maker underneath. To choose a different medicine, select the × in the box and search again.
If the medicine is not found:
- The list says No active medicines match "…". It will be saved as an unlisted medicine.
- If you continue, the name is saved exactly as you typed it and the box shows Not in medicine master — saved as typed.
- Unlisted medicines are not linked to the hospital's records and are never taken from pharmacy stock. Check spelling and strength carefully, and ask your Hospital Admin or pharmacist to add frequently used medicines to the medicine master.
Note: Only Active medicines appear in the search. Medicines marked Inactive or Discontinued by your hospital cannot be prescribed. The list shows up to 20 results — type more letters to narrow it down.
Important: Always check the strength, dosage form and maker shown under the name. Two products with the same name can have different strengths.
9. Enter dosage and instructions
For each medicine row, fill in what applies:
| Column | Example | Notes |
|---|---|---|
| Dosage | 1 tab | How much per dose. |
| Frequency | 2x/day | How often. |
| Duration | 5 days | How long. |
| Qty | 10 | Total quantity to supply. The pharmacy uses this when dispensing. |
| Route | Oral | Choose from the list (Oral, Sublingual, Topical, Inhalation, Nasal, Ophthalmic, Otic, Intravenous, Intramuscular, Subcutaneous, Rectal, Vaginal, Other). |
| Timing | After food | Choose from the list (Before food, After food, With food, Empty stomach, At bedtime, Any time). |
| Instructions | Complete the course | Any extra direction. |
- Select Add Medicine for another row. Pressing Enter in the Instructions box of the last row also adds a new row.
- Select the bin symbol to remove a row.
Nothing is filled in automatically from the medicine master — every clinical value comes from you.
10. Review the prescription
Before saving, check:
- The patient name and age in the header are correct.
- Allergies on the Overview tab have been considered.
- Each medicine's name, strength, form and maker are correct.
- Dosage, frequency, duration and quantity are correct and consistent.
- Route and timing are set where they matter.
- Diagnosis, symptoms and remarks are complete and readable.
- Any follow-up date is set.
11. Save the prescription
Choose one:
- Save Prescription — saves it.
- Save & Print — saves it and opens the print window straight away (see section 12).
What happens next: The form clears and the prescription appears under Previous Prescriptions at the top of the Prescription tab, and on the Prescriptions page.
Common problems:
| Message | What it means / what to do |
|---|---|
| You are not authorized to create a prescription for this patient. | You can only prescribe for patients who have an appointment with you. Ask the front desk to book one. |
| Medicine N: [name] is inactive and cannot be added to a new prescription. | The medicine in row N has been deactivated. Remove it and choose another. |
| Medicine N: Select a medicine or enter its name. | Row N has dosage details but no medicine. Fill in the medicine or remove the row. |
Note: Saving a prescription in the Doctor Portal does not take medicines out of pharmacy stock. Stock is reduced when the pharmacy or hospital staff dispense it from the Admin Portal.
12. View and print prescriptions
-
Select Prescriptions in the sidebar to see all your prescriptions. Search by patient name.
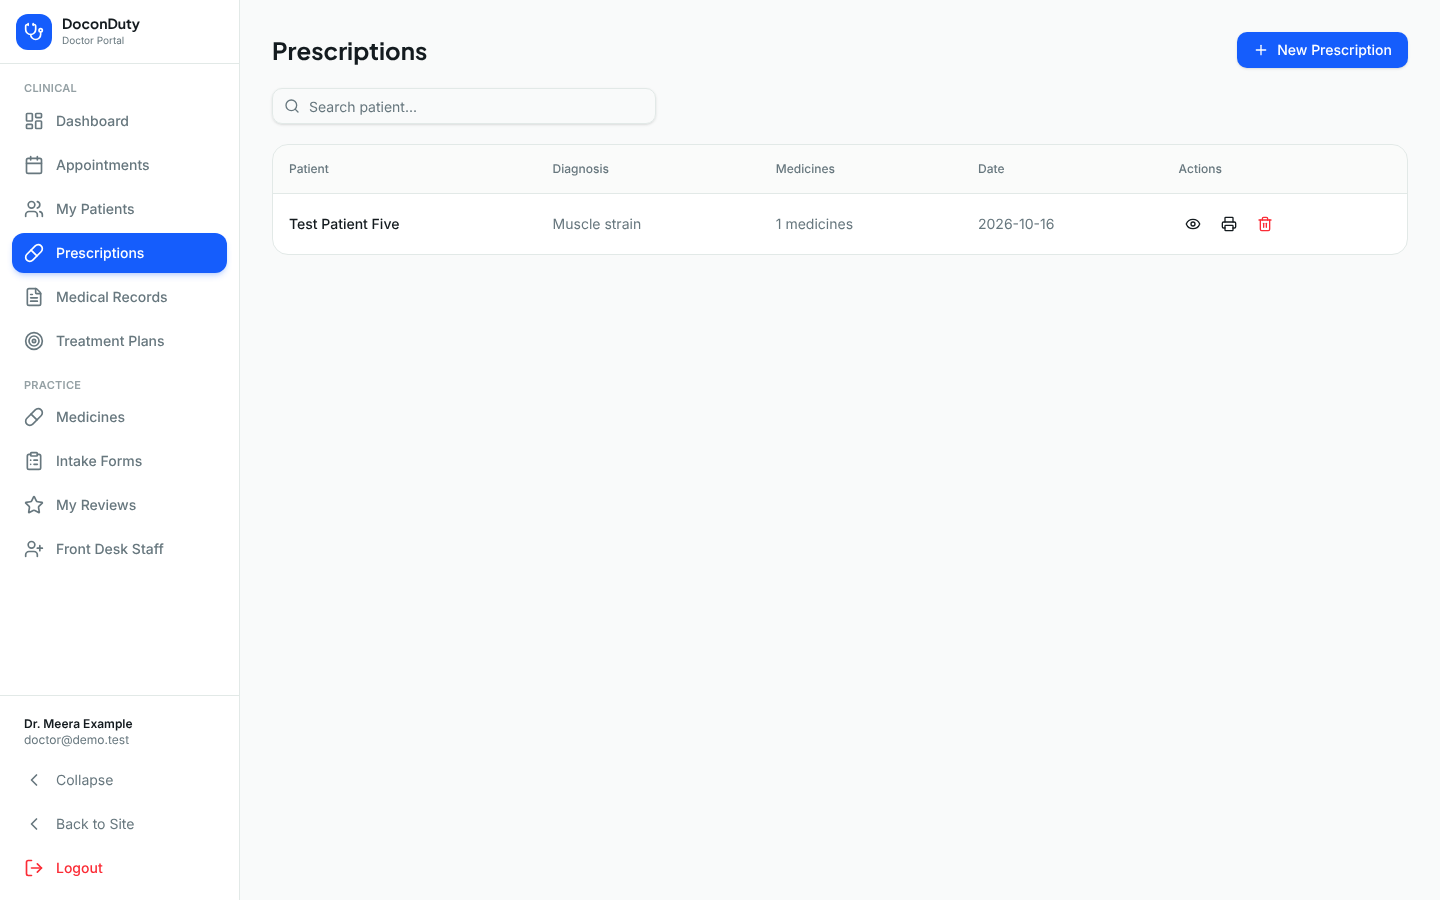
Figure 6 — Your prescriptions. -
Select the eye symbol to view a prescription, or the printer symbol to print it. Printing is also available in the patient's prescription history.
-
A new window opens with the prescription and your browser's print dialog. Choose your printer, or choose Save as PDF to download it.
The printout contains the patient name, date, diagnosis, symptoms, the medicines table (with strength, form and maker), remarks, follow-up date and your name on a signature line. It does not print a logo or letterhead — it leaves space at the top so you can print on your pre-printed letterhead paper.
Note: If nothing happens when you print, your browser may be blocking pop-up windows. Allow pop-ups for the DoconDuty website and try again.
Important: The bin symbol on the Prescriptions page deletes a prescription immediately, without asking you to confirm. Do not delete prescriptions that have been given to a patient.
Not available yet: Editing a saved prescription is not available from the Doctor Portal screens. If a prescription is wrong, write a new correct one and tell the patient and pharmacy which one to use.
13. Arrange a follow-up
There are two separate things:
- Follow-up Date on the prescription — tells the patient when to come back. It is printed on the prescription. It does not book an appointment.
- A follow-up appointment — to reserve the time:
- Select Appointments → New Appointment.
- Choose the Patient, Date, Time Slot, set Type to Follow-up and add a Reason.
- Select Create Appointment.
Note: The patient list in New Appointment contains only patients who already have an appointment with you. For a new patient, ask the front desk to book.
14. Finish the visit
On the consultation screen, select Complete Visit (top right). The message Visit completed appears, the status becomes Completed, and you return to Appointments.
You can also select Complete on an In Progress appointment on the dashboard or Appointments page, or change its status with the menu on the Appointments page.
15. Review previous prescriptions and records
- In a consultation: the Prescription tab lists the last five Previous Prescriptions (with print buttons). Records and Treatment Plan tabs show the patient's records and plans.
- Patient workspace: select My Patients, then a patient. Tabs: Overview (recent appointments), Vitals, Prescriptions (history and a New Prescription form), Medical Records and Treatment Plans.
- Medical Records and Treatment Plans in the sidebar list these for all your patients. These pages are for viewing.
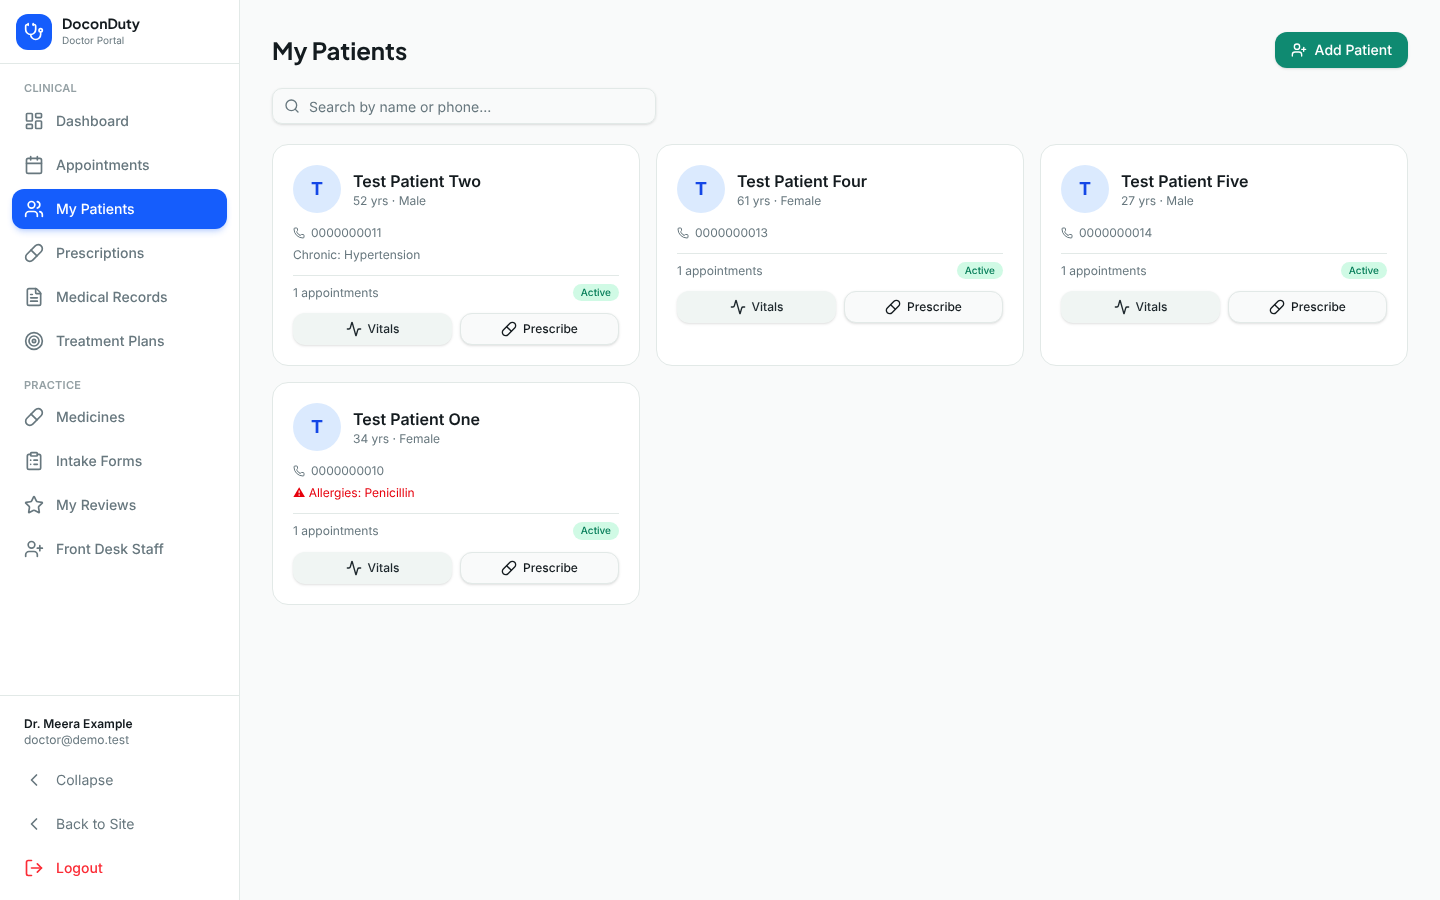
Note: My Patients lists patients who have at least one appointment with you. A patient you add with Add Patient will appear there only after an appointment with you has been booked.
16. Other pages in the Doctor Portal
| Page | What you can do |
|---|---|
| My Patients → Add Patient | Register a patient (name, phone and password required; age, gender, blood group, email, address, allergies, chronic conditions, emergency contact optional). The password is for the patient's own Patient Portal login — give it to the patient privately. |
| Medicines (titled My Medicines) | Add medicines you use to the hospital's medicine master, and edit or delete the ones you added. Medicines you add are Active and can be found by every doctor in your hospital. Search first to avoid duplicates. |
| Intake Forms | Read questionnaires patients have filled in. |
| My Reviews | Read patient ratings and comments. |
| Front Desk Staff | Invite a Front Desk account for your hospital (Full Name, Email, then Invite Front Desk Account). The person receives a temporary password by email and can register patients, book appointments and check patients in — nothing else. The account counts towards your hospital's Front Desk subscription limit, and your Hospital Admin can deactivate it on the Staff page. |
17. Log out securely
Select Logout at the bottom of the sidebar. Always log out before leaving a consulting-room computer that others can use.
Related: Troubleshooting · Glossary · Feature Availability