This guide is for receptionists and front-desk staff who use the Front Desk Portal. It covers finding and registering patients, booking appointments, checking patients in and running the waiting queue. Read Getting Started first.
1. Your screen at a glance
Log in using the Front Desk Portal card and Login as Front Desk. Everything you need is on one page, called Queue in the sidebar.
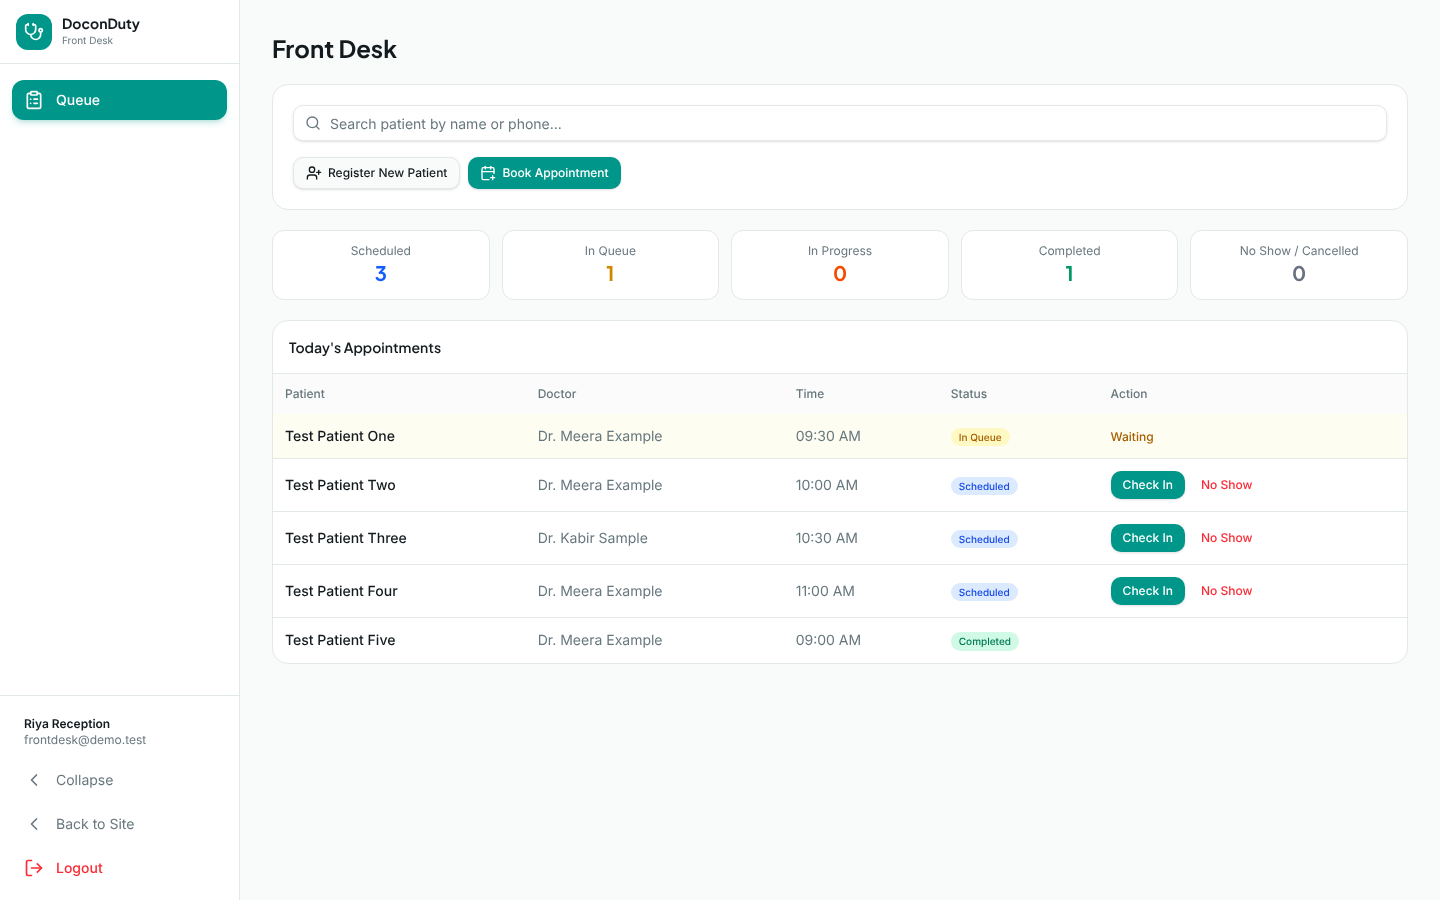
From top to bottom:
- Search patient by name or phone... — the main search box.
- Register New Patient and Book Appointment buttons.
- Five counters for today: Scheduled, In Queue, In Progress, Completed, No Show / Cancelled.
- Today's Appointments — every appointment for today, with Patient, Doctor, Time, Status and Action. Checked-in patients (In Queue) are listed first and highlighted in yellow.
Note: Your account can work with patients and appointments only. You cannot see prescriptions, medical records, bills or medicines.
2. Find an existing patient
Purpose: Find a patient who is already registered, before booking or registering.
Who can do this: Front Desk (and Hospital Admin).
Steps:
- Click in Search patient by name or phone....
- Type part of the patient's name or phone number.
- Up to eight matching patients appear, each with name, phone number and age.
- Confirm the right person by asking for their phone number and age, then select Select → next to their name.
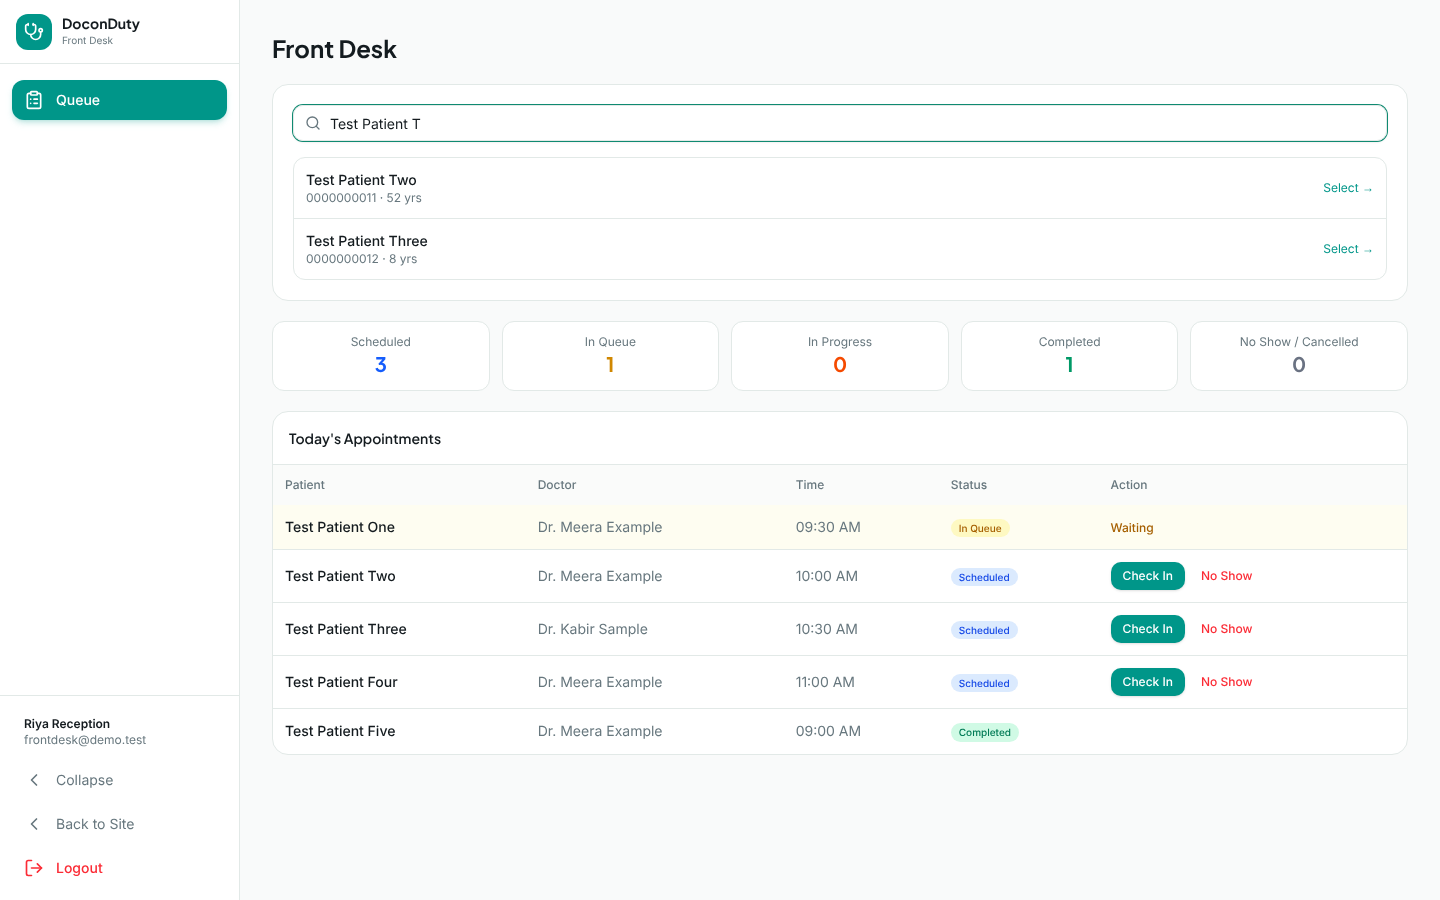
What happens next: A box opens with the patient's name and phone number and a New Appointment section (see section 4). Select Change patient if you chose the wrong person.
Tip: Searching by phone number is usually more reliable than by name, because many patients share similar names.
3. Register a new patient
Purpose: Add a patient who has never been registered at your hospital.
Who can do this: Front Desk (and Hospital Admin).
Before you begin: Search by name and by phone number first (section 2). Register only if you are sure the patient is not already in the system.
Steps:
- Select Register New Patient. (If a search found nothing, you can also select Register New Patient next to No matching patient found — the name you typed is copied in for you.)
- Fill in Full name * and Phone * (both required) and, if known, Age.
- Read the name and phone number back to the patient to check the spelling.
- Select Register & Continue.
What happens next: The message Patient registered appears and the new patient is selected, ready for booking an appointment.
Common problems: Name and phone required — fill in both fields.
Note: This quick form records only name, phone and age. Other details (gender, blood group, email, address, allergies, chronic conditions, emergency contact) can be added later by a Hospital Admin or doctor. Tell the doctor about any allergies the patient mentions.
4. Book an appointment
Purpose: Reserve a time with a doctor for a patient.
Who can do this: Front Desk (and Hospital Admin and doctors).
Before you begin: Know which doctor the patient needs, the date and the preferred time.
Steps:
- Choose the patient in one of two ways:
- search and select them as in section 2 (or register them as in section 3); or
- select Book Appointment, type the patient's name or phone in the search box that appears, and select them.
- Under the patient's name, open Select doctor and choose the doctor. Each doctor is shown with their specialization. Only active doctors are listed.
- Choose the date (you cannot choose a date in the past).
- Open Time slot and choose a time. Slots run every 30 minutes from 09:00 AM to 12:00 PM and from 02:00 PM to 05:00 PM. For today, times that have already passed are not offered.
- Type the Reason for visit (optional) — for example "fever for three days".
- Check the patient, doctor, date and time with the patient.
- Select Create Appointment.
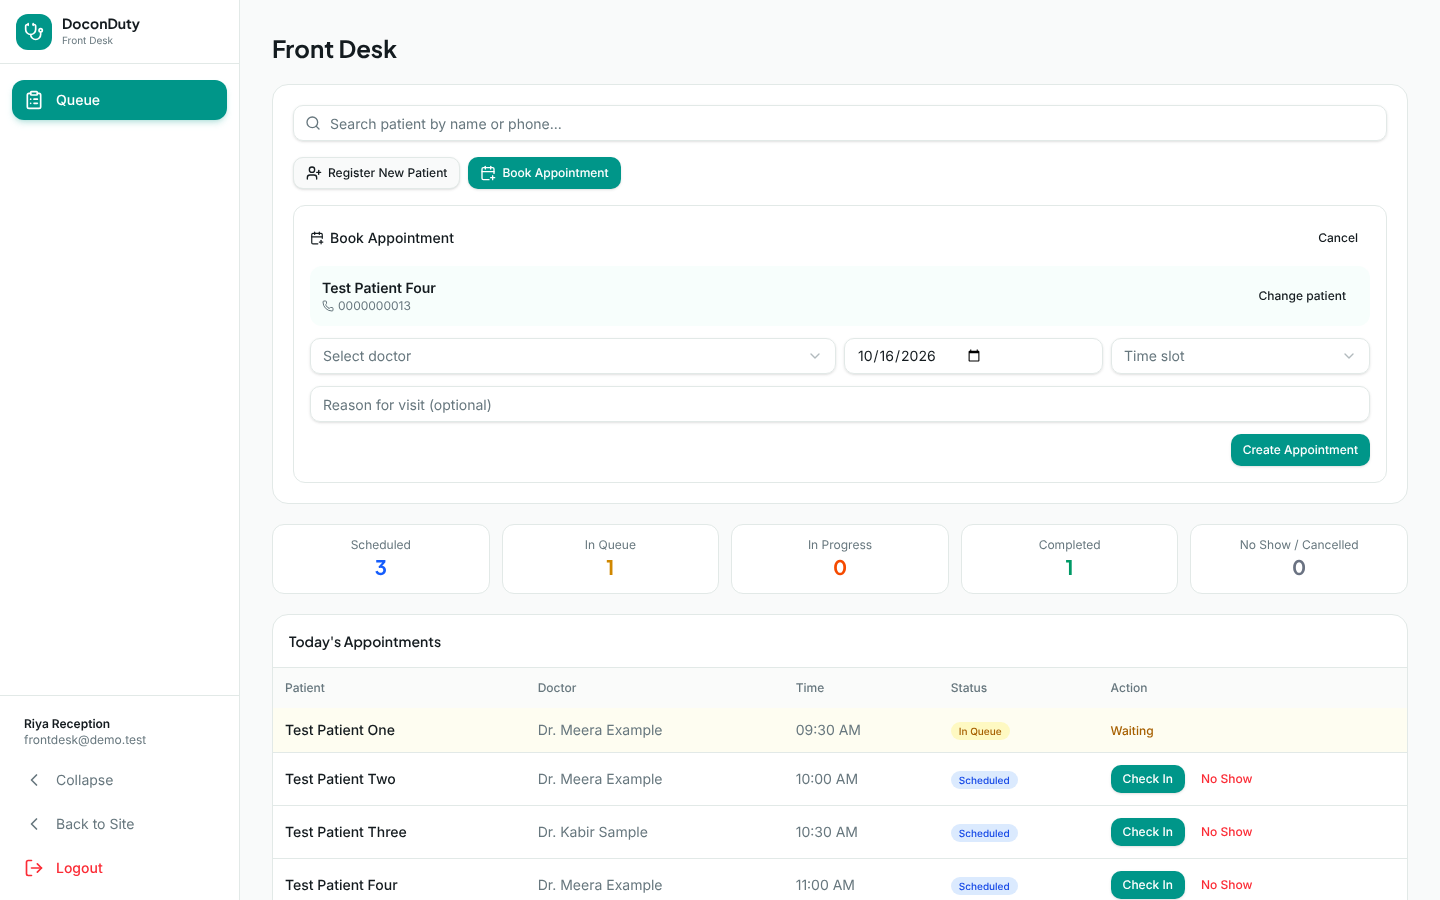
What happens next: The message Appointment created appears. If the appointment is for today, it appears in Today's Appointments with the status Scheduled.
Common problems:
| Message | What to do |
|---|---|
| This time slot is already booked. | The doctor already has a patient at that time. Choose another slot. |
| Patient, doctor, date and time slot are required | Fill in every field except the reason. |
| No slots left (shown in the Time slot box) | No more slots remain today. Choose another date. |
Note: Appointments booked from the Front Desk page are always In-Person appointments. Video consultations are no longer offered.
5. Check a patient in
Purpose: Record that the patient has arrived, take their intake measurements, and put them in the doctor's waiting queue.
Who can do this: Front Desk.
Before you begin: The patient must have a Scheduled appointment for today. Have your measuring equipment ready.
Steps:
- In Today's Appointments, find the patient and confirm their identity.
- Select Check In in the Action column.
- A Check In — [patient name] box opens. Enter any measurements you have taken: Height (cm), Weight (kg), Temp (°F), Systolic BP, Diastolic BP, Heart rate, SpO2 (%), Blood glucose, and any Intake notes (optional). All measurements are optional — leave a box empty if you did not measure it.
- Check each number before saving. Temperature is in degrees Fahrenheit.
- Select Complete Check-In → In Queue.
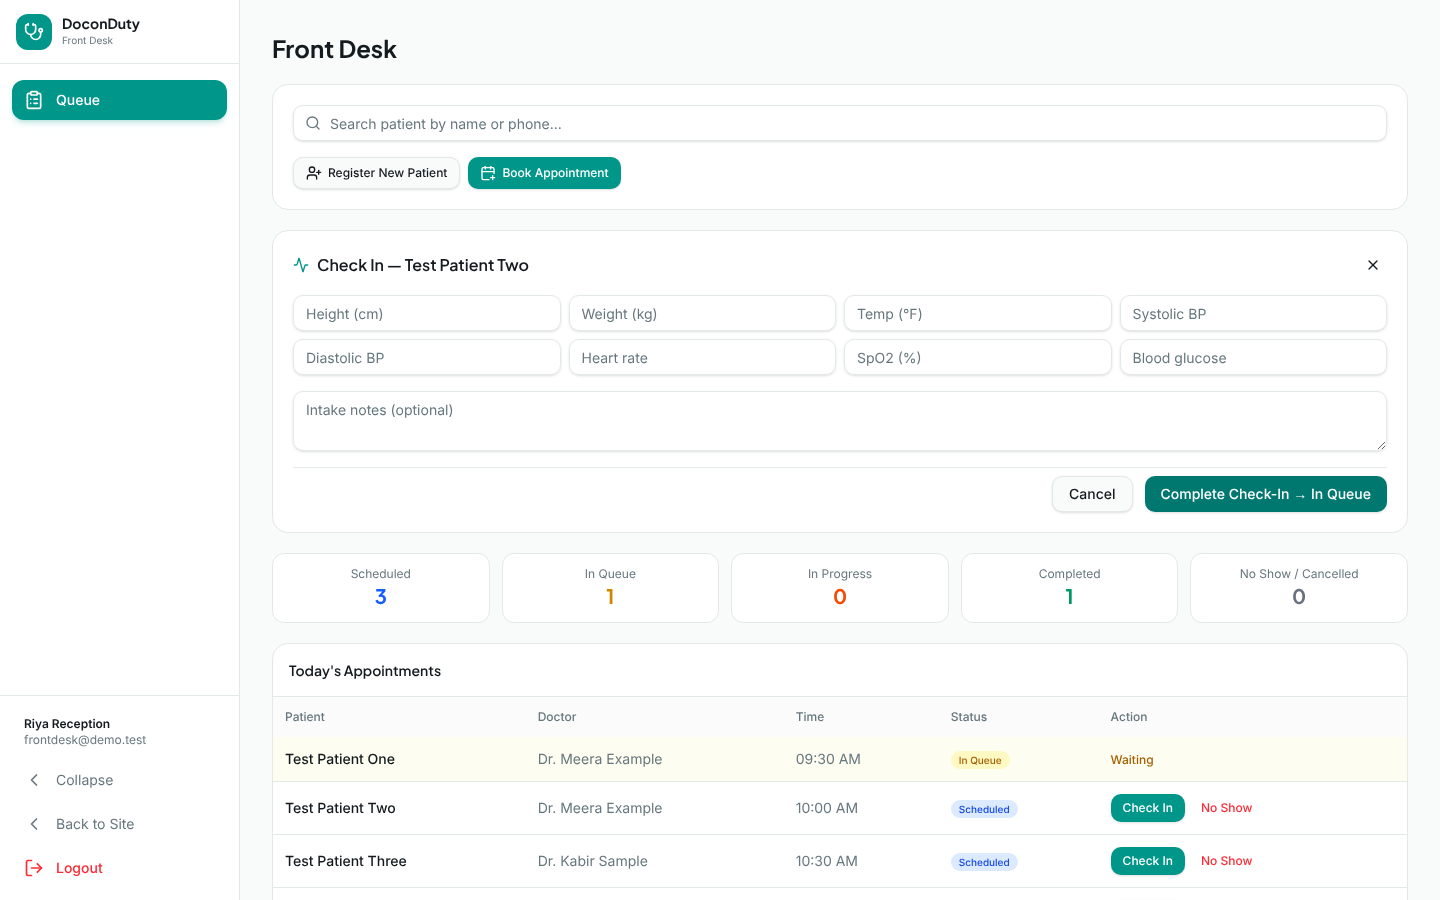
What happens next: The message [patient] checked in — now In Queue appears. The appointment moves to the top of the list, highlighted, with Waiting in the Action column. The doctor sees the patient as Ready — waiting and can see the vitals you recorded.
Common problems: Check-in failed — check your internet connection and try again. If you selected Cancel, nothing was saved.
Important: If you typed a measurement wrongly, tell the doctor. A corrected reading can be added by the doctor; earlier readings are kept in the history.
6. Manage the waiting queue
- The counters show how many of today's appointments are in each status.
- In Queue patients are at the top in the order they should be seen; they show Waiting.
- When the doctor starts the consultation, the status changes to In Progress; when the doctor finishes, it changes to Completed. You do not need to do anything for these changes.
- Reload the page (F5) to see the latest changes made by doctors.
7. Understanding appointment status
| Status | Meaning | Who changes it |
|---|---|---|
| Scheduled | Booked; the patient has not arrived yet. | Set when booked. |
| In Queue | Checked in; waiting for the doctor. | You, with Check In. |
| In Progress | The doctor is seeing the patient. | The doctor, by starting the consultation. |
| Completed | The visit is finished. | The doctor. |
| No Show | The patient did not come. | You, with No Show. |
| Cancelled | The appointment will not take place. | Hospital Admin or doctor. |
8. Cancellations, no-shows and rescheduling
Patient did not arrive: select No Show next to their Scheduled appointment. The appointment is counted under No Show / Cancelled. This happens immediately, without a confirmation message.
Patient wants to cancel or change the time:
Not available yet: The Front Desk page does not have Cancel or Reschedule buttons. To change an appointment:
- Ask your Hospital Admin (or the patient's doctor) to cancel or move the existing appointment. Hospital Admins can do this from Appointments in the Admin Portal.
- For a new time, you can book a new appointment (section 4) — but make sure the old appointment is cancelled so the patient is not booked twice.
9. Avoiding duplicate patients and appointments
DoconDuty does not stop you from registering the same person twice, so please follow these rules:
- Always search before registering — by phone number and by name.
- If you find a similar record, confirm age and phone number with the patient before deciding it is a different person.
- Never register a family member under another person's record, even if they share a phone number. Each person needs their own record.
- Before booking, look at Today's Appointments (and ask the patient) to check they do not already have an appointment.
- Book once, then wait for the Appointment created message — do not press Create Appointment repeatedly if the screen is slow.
- If you discover a duplicate patient or appointment, tell your Hospital Admin so it can be corrected.
10. Protecting patient information
- Keep the screen turned away from the waiting area.
- Do not read out medical details or measurements where other patients can hear.
- Confirm identity (name plus phone number or age) before sharing appointment details.
- Never give patient information over the phone to someone you cannot identify.
- Log out when you leave the desk; do not share your login with colleagues.
Related: Getting Started · Troubleshooting · Glossary